
Oliver + S Jump Rope Dress

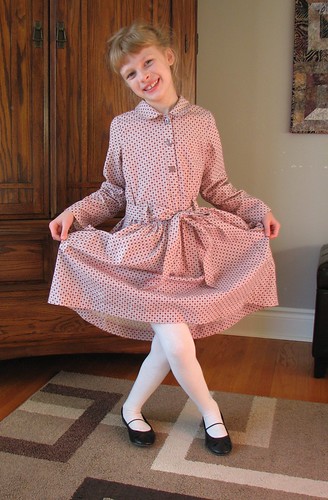
This is a repeat make for me. You can see the first one here. I started wanting to make this dress when I made this basic skirt for my daughter. Oliver + S patterns are a joy to sew and result in classy looking clothes for little people (and now they're available to download at BurdaStyle).

Oliver + S Jump Rope Dress

The pattern envelope says this dress has a "slightly dropped waist." I didn't really get that result the first time around, but this time it does look like that. I intentionally made the dress a little big because I want it to be wearable all the way until spring.

Oliver + S Jump Rope Dress

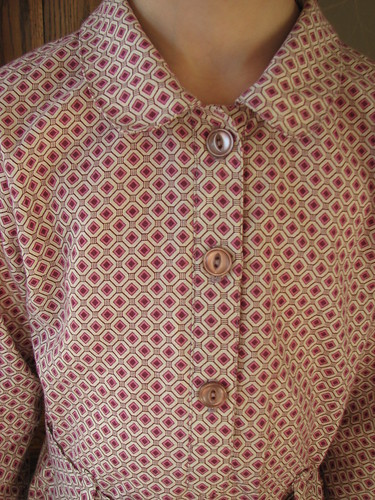
The instructions for the placket and collar are fantastic. They walk you through each step and it looks great at the end. The buttons are from stash.

Oliver + S Jump Rope Dress

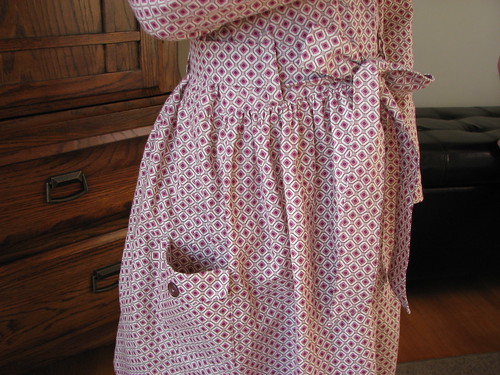
The pockets are my favorite part of the dress, I think. It's nice to have some detail on the skirt part.

This fabric was going to be for me. That was my thought when I purchased it in NYC last spring. But, my daughter really liked it and I thought it would work for this pattern. I also made her a pair of leggings from a purplish mauve knit that I had in stash (no picture). The leggings are more school-friendly than tights are.

Oliver + S Jump Rope Dress

I've made some clothes for my younger daughter that I need to post yet. My son has noticed that I'm sewing a lot of girl clothes and not anything for him. He doesn't really need clothes, but he didn't think that was a great reason for me to not be sewing for him. I should probably include him in the fun. Add that to the "to sew" list...

Comments

  1. I suppose it's a good compliment that he wants clothing that you made. I'm not sure my brothers ever expressed a want for clothing, unless it was not wanting to part with favourite items when they got too small.

    ReplyDelete
  2. This dress is just adorable. Your daughter looks so happy in it!

    ReplyDelete

Post a Comment

Popular posts from this blog

Grocery Bags

More gifts! These are just like the still-all-too-ubiquitous plastic grocery bags, but they're fabric.  I followed this tutorial and you actually use a plastic bag as a pattern.  The instructions are very good and include a pocket so that the bag can be folded up and is easy to keep in a purse or a car's glove box. Mostly for the sake of the gift recipients, here's how to fold up the bag.... 1.  Lay the bag pocket side down and fold it length-wise using the edges of the pocket as a guide. 2.  Fold it in half, aligning the top of the handles with the bottom of the bag. 3.  Fold in half again and then reach into pocket with your hand and turn the whole thing (pocket included) inside out. Happy shopping!

Shopping Bags

Most stores in our town charge you a nickel for a plastic bag when you check out. I love this practice and the way that it encourages people to bring their own cloth bags or reuse their plastic ones. My habit of bringing along bags to the grocery store is well established, but I used to find myself stuck at places like the drug store or farmer's market or other impromptu stops. Then I picked up a bag at an upscale kitchen goods store that rolls up quite compactly. Now I keep that in my purse, so I always have a bag with me. I like my bag so much that I wanted to replicate it for the art sale. The final result is a hybrid of the bag I purchased and these that I made last year. The bag is a little bigger than the average plastic grocery bag. The velcro tab is used to keep the bag rolled up, but also can close the top of the bag when it is full. Most of the bag is a single layer of cotton, but the handles are faced. There is a double row of top-stitching around both edges of

The Burda Skirt Again

I'm not sure what prompted it, but awhile ago I decided that I needed a green skirt. The last time I was at Fabricland I saw this green wide-wale corduroy. I wasn't really looking for the skirt to be corduroy and the color was a little different than I was hoping for, but since I had my eyes peeled for awhile and hadn't seen anything better, I thought I'd try the corduroy. After looking for a suitable pattern, I settled on the Burda 2/2010 skirt that I've already used three times . Because of the weight and bulk of the corduroy, I didn't want to try to mess with too many details. I'll use another skirt pattern soon. Really, I will. One of the things I really like about this pattern is the pockets. This time I made the pocket facings and part of the pocket bag out of a cotton woven solid to reduce bulk. Since I'll be wearing this skirt with tights I added a lining. Adding the lining was really simple except that I cut the lining exactly the sam