
Oliver + S Jumprope Dress

It's been a few weeks since I made this dress. Like my last Oliver + S experience, I have only good things to say about the Jumprope Dress pattern. The style is as cute as can be, the drafting and sizing is great and the instructions are fantastic. But, I don't think I made a good match of pattern and fabric. The details on the dress are what makes it so cute, but with the print I used, they are really hard to pick out. So hard that I didn't even bother to try photographing them.

Oliver + S Jumprope Dress

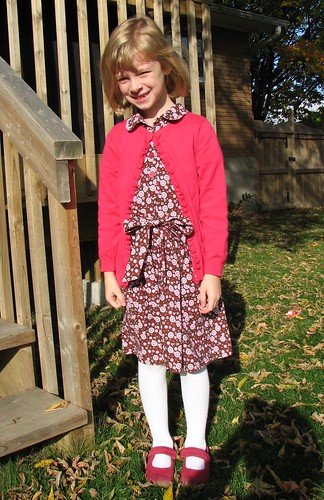
We chose the fabric to go along with the sweater that my daughter already had and that really limited our options. The dress is still cute enough and I'm not unhappy with it, but it isn't everything I was hoping it would be. Using a solid pink for some of the details would have been ideal, but of course I didn't have the right color in my stash and I wasn't able to work in a trip to the fabric store before the dress needed to be finished. The fact that my local Fabricland is 45 minutes away now has been really irritating lately.

I'll be making this dress again in a solid or more subtle print, but likely not until summer.

Comments

  1. Well, she looks adorable!

    Fun to see your goals in the side bar. How are things going with that?

    ReplyDelete
  2. This outfit is really adorable! Just so girly :) and pretty. I remember dressing my daughter like this, such a great age.

    ReplyDelete
  3. I like the jumprope dress as well! It looks great styled with the sweater and shoes!

    ReplyDelete

Post a Comment

Popular posts from this blog

The Burda Skirt Again

I'm not sure what prompted it, but awhile ago I decided that I needed a green skirt. The last time I was at Fabricland I saw this green wide-wale corduroy. I wasn't really looking for the skirt to be corduroy and the color was a little different than I was hoping for, but since I had my eyes peeled for awhile and hadn't seen anything better, I thought I'd try the corduroy. After looking for a suitable pattern, I settled on the Burda 2/2010 skirt that I've already used three times . Because of the weight and bulk of the corduroy, I didn't want to try to mess with too many details. I'll use another skirt pattern soon. Really, I will. One of the things I really like about this pattern is the pockets. This time I made the pocket facings and part of the pocket bag out of a cotton woven solid to reduce bulk. Since I'll be wearing this skirt with tights I added a lining. Adding the lining was really simple except that I cut the lining exactly the sam...

Vogue 9091 - Black Culottes

Every once in awhile I feel like I want something "different" in my closet. Generally I'm not super trendy, but from time to time an odd trend appeals to me. This time it was culottes. I had a piece of black wool in my stash that was too lightweight for pants. Using it for a skirt was an option, but that would have left a good sized remnant that would be too big to toss and too small to do much else with. Since it was lightweight and had some good drape, I thought it could work for culottes. Plus, stash fabric seems "free" to me, so if it was a total bust not much was lost. There are quite a few patterns for culottes available now. The one I chose was  Vogue 9091 . I prefer a yoke to a regular waistband. Views A and B are considered culottes and View C is considered pants. I chose to make View C, but shortened it by five inches. I also added a lining, but those are the only real changes. This is not a complicated pattern. The pleats are deep and gett...

Grocery Bags

More gifts! These are just like the still-all-too-ubiquitous plastic grocery bags, but they're fabric.  I followed this tutorial and you actually use a plastic bag as a pattern.  The instructions are very good and include a pocket so that the bag can be folded up and is easy to keep in a purse or a car's glove box. Mostly for the sake of the gift recipients, here's how to fold up the bag.... 1.  Lay the bag pocket side down and fold it length-wise using the edges of the pocket as a guide. 2.  Fold it in half, aligning the top of the handles with the bottom of the bag. 3.  Fold in half again and then reach into pocket with your hand and turn the whole thing (pocket included) inside out. Happy shopping!