
Stenciled Shirts

For awhile now I've wanted to try freezer paper stencils with fabric paint. A few weeks ago I got myself to Michael's to pick up the paint. I did that before deciding on a stencil pattern or getting freezer paper, so when I saw a package of sticky stencils for fabric embellishing purposes I easily talked myself into buying the stencils rather than making them.

I made a new T-shirt for each of my older kids. There is a possibility that I'll make one for my younger daughter yet, but it would be to assuage my guilt rather than make her feel good - she doesn't really care (yet) that I don't make much for her.

For my son's shirt I used navy blue cotton jersey that has been in my stash for a loooong time and Kwik Sew 2918. My daughter's shirt is made with leftovers of this shirt of mine and Burda 9549, just like this shirt.

Stenciled T-shirts

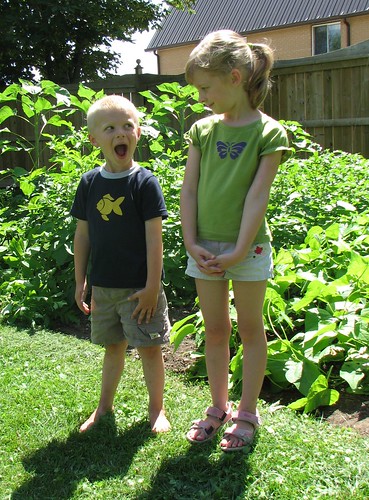
I didn't get any decent close-ups because my son is constantly in motion. Most of the pictures I took are some variation of this:

Stenciled T-shirts

And it didn't take long before they started looking like this:

Stenciled T-shirts
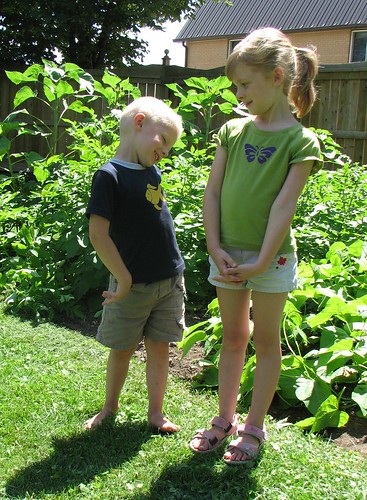
Pleeease, mom, can we be done now?


With these two shirts, I am done with the summer sewing for my kids. Now we're back to doing laundry once a week.

Comments

  1. Very cute! I took your cue and started making t-shirts for my daughter!

    ReplyDelete
  2. Ah very nice tops ~ & kids too :)

    The stenciling turned out great.

    ReplyDelete
  3. Good work Renee! Great pics of the little man.

    ReplyDelete
  4. Very cute shirts. Very cute kids. It's so hard to get the children to pose, but the results are the best!!!

    ReplyDelete
  5. Those are so cute.

    Trudy
    www.sewingwithtrudy.blogspot.com

    ReplyDelete
  6. the pics are great! thanks
    (the shirts too)

    ReplyDelete
  7. and check out that garden!

    ReplyDelete

Post a Comment

Popular posts from this blog

The Burda Skirt Again

I'm not sure what prompted it, but awhile ago I decided that I needed a green skirt. The last time I was at Fabricland I saw this green wide-wale corduroy. I wasn't really looking for the skirt to be corduroy and the color was a little different than I was hoping for, but since I had my eyes peeled for awhile and hadn't seen anything better, I thought I'd try the corduroy. After looking for a suitable pattern, I settled on the Burda 2/2010 skirt that I've already used three times . Because of the weight and bulk of the corduroy, I didn't want to try to mess with too many details. I'll use another skirt pattern soon. Really, I will. One of the things I really like about this pattern is the pockets. This time I made the pocket facings and part of the pocket bag out of a cotton woven solid to reduce bulk. Since I'll be wearing this skirt with tights I added a lining. Adding the lining was really simple except that I cut the lining exactly the sam...

Simplicity 8014 - Black Shirtdress

I do love a nice collared shirt, so the shirtdress seems like a natural extension of that. There are so many good shirtdress patterns available right now, it was a little difficult to choose. The one I used here is Simplicity 8014 , View D. I really liked the denim version on the envelope, but I wanted the option of wearing this to work, so no denim for me. I had considered trying this in silk, but shortly before I went fabric shopping I messed up this silk top with some sort of oil stain. My attempts at treating it only seemed to make it worse. Only low-maintenance laundry items for me, I guess. This fabric is polyester. I wouldn't say it was a joy to work with, but it wasn't bad. After making a muslin, I was pretty pleased with the fit. I removed 1.5" in width from the back - only the dress piece, not the yoke. I also added 2" in length to the skirt. The pattern has gathers at CB, but I changed that to a pleat. I also omitted the pockets. In the final ...

Grocery Bags

More gifts! These are just like the still-all-too-ubiquitous plastic grocery bags, but they're fabric.  I followed this tutorial and you actually use a plastic bag as a pattern.  The instructions are very good and include a pocket so that the bag can be folded up and is easy to keep in a purse or a car's glove box. Mostly for the sake of the gift recipients, here's how to fold up the bag.... 1.  Lay the bag pocket side down and fold it length-wise using the edges of the pocket as a guide. 2.  Fold it in half, aligning the top of the handles with the bottom of the bag. 3.  Fold in half again and then reach into pocket with your hand and turn the whole thing (pocket included) inside out. Happy shopping!