
Simplicity 2245 - Navy Tunic

Awhile ago I was inspired by this photo via Pinterest. I liked the layers, the simple lines and the mix of neutral colors. I was pretty convinced that her dress was navy, but now I think it's actually dark grey. It took me awhile to get over the "no-no" of navy and black together, but lately I really like it. Same with brown and black. So, this is me combining as many neutral colors as possible:

Simplicity 2245

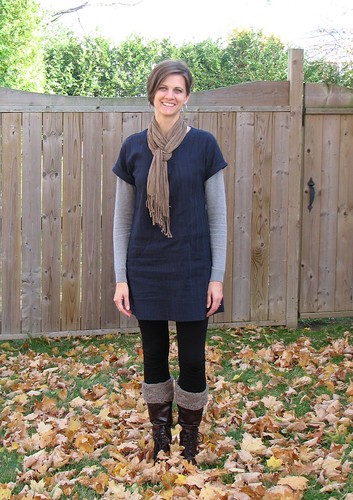
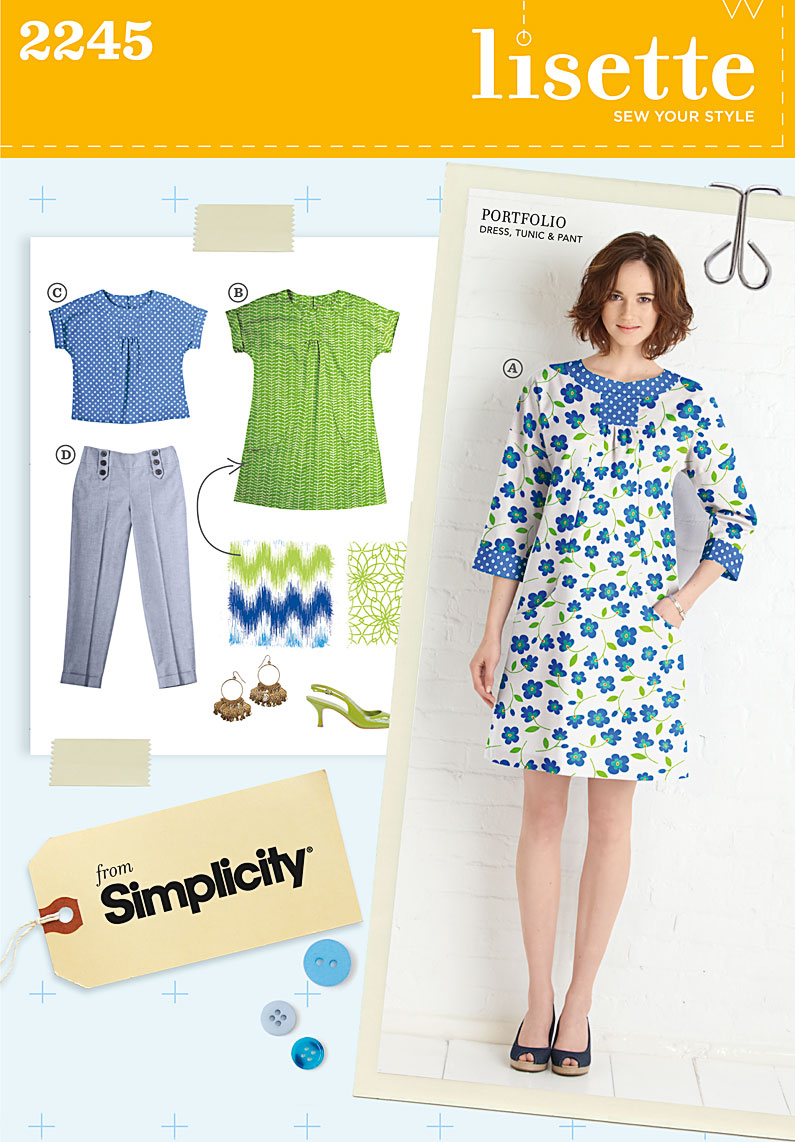
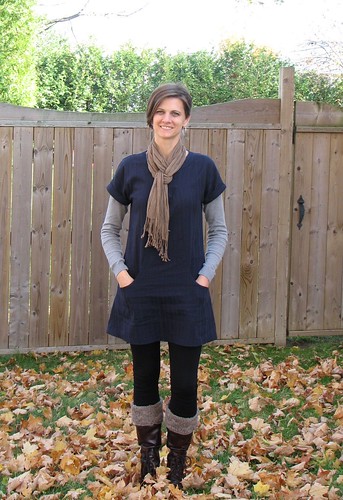
The tunic is the noteworthy item here. The pattern is Simplicity 2245, a lisette pattern that I purchased awhile ago. I made View B, the tunic.


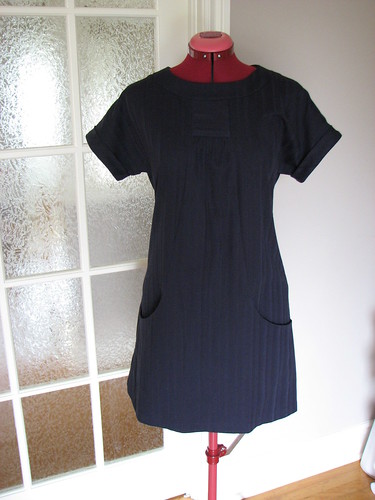
Based on other reviews and the fact that my fabric had some stretch, I went down two sizes. I also added darts in the back for a more streamlined shape there. There were no changes otherwise - this is an easy project!

Simplicity 2245

The pockets are a great feature of this pattern. The instructions for completing them are great - they look more complicated than they are.

Simplicity 2245

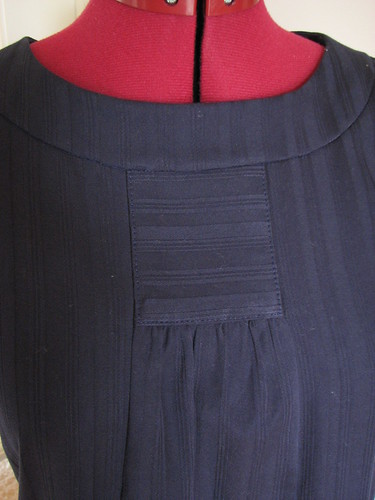
The fabric is a stretch cotton blend with tone-on-tone stripes. I like the subtle texture the stripes create. Just for the fun of it, I cut the yoke piece on the cross grain.

Simplicity 2245

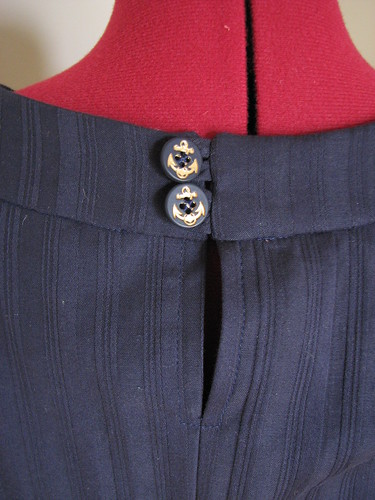
The neckline closes in back with buttons and loops, but I don't actually need them for getting in and out of the tunic. However, I suspect I would need them if my fabric didn't stretch. These two lovely anchor buttons were waiting in the button jar for just such a time as this.

Simplicity 2245

I also made the leggings, sometime last winter from a Burda pattern. They're made from ponte knit, so they're heavy enough to be warm and opaque enough for me to feel sufficiently covered.

Comments

  1. Cute! And easy to wear too. I like the navy blue colour.

    ReplyDelete
  2. Love this tunic, when you say you put some darts in the back - do you mean vertical ones? Have made 2 tunics now that are just a bit sack like despite darts but really like the shape of yours.

    ReplyDelete
    Replies
    1. Yes, vertical darts - one on each side of the center back. I added them after trying it on, so it was mostly completed. That allowed me to adjust them to the most flattering depth and length.

      Delete
  3. i'm so in love with this dress, i need to find this pattern somewhere

    ReplyDelete
  4. I'm looking to find a copy of this pattern but I can't find it anywhere. If anyone is ready to let theirs go I'd be willing to buy it from you!

    ReplyDelete
  5. I pinned this post a long time ago b/c I loved the look of the navy with neutrals. I finally made a dress (totally different pattern) and have an outfit with the same kind of look but done my way :)
    http://makingmorewithless.blogspot.ca/2014/02/dress-2-for-me.html
    So, thanks for the inspiration!!

    ReplyDelete
    Replies
    1. Thanks for sharing the link to your dress, Suzanne! It looks lovely. This outfit remains a favorite of mine to wear - cute and comfortable. I hope you enjoy yours, too!

      Delete
  6. If you want to sell this pattern, I would like to purchase.

    ReplyDelete
  7. I have been looking for a copy of this pattern, is there a chance you would sell yours or be willing to let me make a copy of it and return it to you? Pnachtigal at cox dot net

    ReplyDelete

Post a Comment

Popular posts from this blog

Grocery Bags

More gifts! These are just like the still-all-too-ubiquitous plastic grocery bags, but they're fabric.  I followed this tutorial and you actually use a plastic bag as a pattern.  The instructions are very good and include a pocket so that the bag can be folded up and is easy to keep in a purse or a car's glove box. Mostly for the sake of the gift recipients, here's how to fold up the bag.... 1.  Lay the bag pocket side down and fold it length-wise using the edges of the pocket as a guide. 2.  Fold it in half, aligning the top of the handles with the bottom of the bag. 3.  Fold in half again and then reach into pocket with your hand and turn the whole thing (pocket included) inside out. Happy shopping!

Shopping Bags

Most stores in our town charge you a nickel for a plastic bag when you check out. I love this practice and the way that it encourages people to bring their own cloth bags or reuse their plastic ones. My habit of bringing along bags to the grocery store is well established, but I used to find myself stuck at places like the drug store or farmer's market or other impromptu stops. Then I picked up a bag at an upscale kitchen goods store that rolls up quite compactly. Now I keep that in my purse, so I always have a bag with me. I like my bag so much that I wanted to replicate it for the art sale. The final result is a hybrid of the bag I purchased and these that I made last year. The bag is a little bigger than the average plastic grocery bag. The velcro tab is used to keep the bag rolled up, but also can close the top of the bag when it is full. Most of the bag is a single layer of cotton, but the handles are faced. There is a double row of top-stitching around both edges of

The Burda Skirt Again

I'm not sure what prompted it, but awhile ago I decided that I needed a green skirt. The last time I was at Fabricland I saw this green wide-wale corduroy. I wasn't really looking for the skirt to be corduroy and the color was a little different than I was hoping for, but since I had my eyes peeled for awhile and hadn't seen anything better, I thought I'd try the corduroy. After looking for a suitable pattern, I settled on the Burda 2/2010 skirt that I've already used three times . Because of the weight and bulk of the corduroy, I didn't want to try to mess with too many details. I'll use another skirt pattern soon. Really, I will. One of the things I really like about this pattern is the pockets. This time I made the pocket facings and part of the pocket bag out of a cotton woven solid to reduce bulk. Since I'll be wearing this skirt with tights I added a lining. Adding the lining was really simple except that I cut the lining exactly the sam