No new fabric until after Christmas. That's my goal. I love accomplishing a goal. To make it happen I'm cutting out several things at once and then sewing them up. Some of this first batch were things that were necessary for my daughter's wardrobe (this and that) and then others are fabrics that I bought for a certain purpose but aren't very exciting to sew, so they have been pushed waaaaay down on the list.
First, is this fleece pullover for my older daughter. I bought this fleece as a remnant when the Fabricland in town closed. Each season I like to make sure each of the kids has at least one of these extra layer type garments. My older daughter has been lacking one for awhile now. Ottobre to the rescue.

This is the "New Generation sweatshirt" (#38) from the 1/2010 issue. I wasn't hopeful about finding a matching zipper and didn't want to buy one, so I went with one that I had and made it look purposeful by adding coordinating piping and collar facing. The whole thing is giving me a bit of an 80's vibe - the color combo or the style or both? I'm okay with it and my daughter likes it.
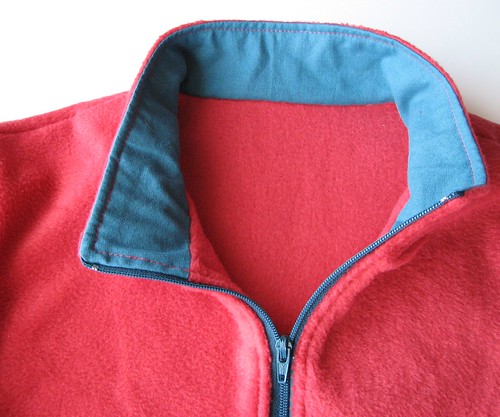
I was confused by the pattern pieces related to the pocket. I was unsure if I was just not understanding or if there was a drafting error. I don't have a picture and it's hard to explain without it, but I did some redrafting of the front side panel piece to make it work for me.

The other change I made was to lengthen the sleeves and finish them with elastic rather than a cuff. I do prefer a cuff to elastic on these type of garments, but didn't have a suitable fabric.
The second was going to be a similar top for myself - an extra layer for when the house feels chilly. I like the vest I made from Kwik Sew 3453, but I think it's a little small now and I wanted to have long sleeves. I tried just adding a sleeve from a different pattern without really checking if they were compatible (I'm sure you know where this is going).

My first mistake was cutting the vest pieces too big. I mistakenly thought I had made a medium before, but it was actually a small. This time I used size large, which was much too large. Then the sleeves didn't fit at all. Not even close. Blegh. But, I had done a great job with the zipper and it seemed like a shame to just toss the whole thing, so I did finish the armholes and put it on the donate pile.
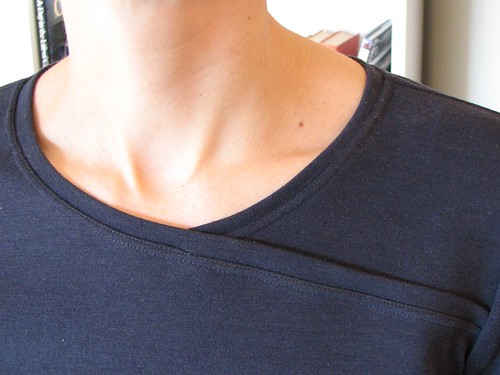
And, finally, a basic long sleeved top from the leftovers of this dress. I thought I'd just cut it out and sew it up rather than filing it away in the fabric closet. This isn't an exciting new garment, but it's great for days spent at home cleaning or baking or relaxed weekend days. It's warm but not bulky, covered up but not sloppy.

The pattern is Vogue 8536 and I've made it before, but this time I followed Elle's suggestion and simplified the front. I like it a lot better this way.
Now both of my machines are in the shop getting a good cleaning and tune up and I'm starting on the next round of cutting out. All from stash!
First, is this fleece pullover for my older daughter. I bought this fleece as a remnant when the Fabricland in town closed. Each season I like to make sure each of the kids has at least one of these extra layer type garments. My older daughter has been lacking one for awhile now. Ottobre to the rescue.
I'm counting on those wrinkles coming out in the wash!
I was confused by the pattern pieces related to the pocket. I was unsure if I was just not understanding or if there was a drafting error. I don't have a picture and it's hard to explain without it, but I did some redrafting of the front side panel piece to make it work for me.
The other change I made was to lengthen the sleeves and finish them with elastic rather than a cuff. I do prefer a cuff to elastic on these type of garments, but didn't have a suitable fabric.
The second was going to be a similar top for myself - an extra layer for when the house feels chilly. I like the vest I made from Kwik Sew 3453, but I think it's a little small now and I wanted to have long sleeves. I tried just adding a sleeve from a different pattern without really checking if they were compatible (I'm sure you know where this is going).
My first mistake was cutting the vest pieces too big. I mistakenly thought I had made a medium before, but it was actually a small. This time I used size large, which was much too large. Then the sleeves didn't fit at all. Not even close. Blegh. But, I had done a great job with the zipper and it seemed like a shame to just toss the whole thing, so I did finish the armholes and put it on the donate pile.
And, finally, a basic long sleeved top from the leftovers of this dress. I thought I'd just cut it out and sew it up rather than filing it away in the fabric closet. This isn't an exciting new garment, but it's great for days spent at home cleaning or baking or relaxed weekend days. It's warm but not bulky, covered up but not sloppy.
The pattern is Vogue 8536 and I've made it before, but this time I followed Elle's suggestion and simplified the front. I like it a lot better this way.
Everything looks so professionally made. Someone is going to be very happy to get the vest and the neckline on the t-shirt is awesome.
ReplyDeleteI love that knit top. The neckline takes it from "plain ol' t-shirt" to something special. I'm sure your daughter loves her bright, fun pullover. Great color combo!
ReplyDeleteCute fleeces! Great job!
ReplyDelete