
Coat Progress - Part 4

I'm just really not very good with in-progress posts. I thought it might be a good thing for a longer project like this coat, but I still just sew along without thinking to stop for pictures. Oh, well. I think this will be the last progress post before it is complete Woohoo!

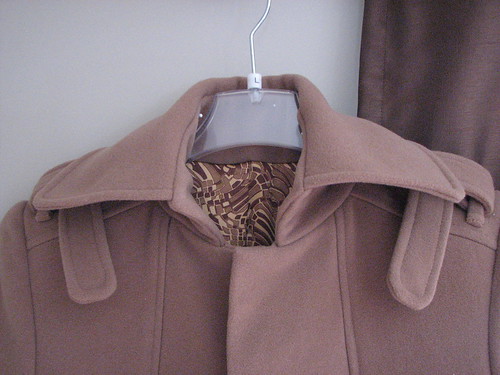
Let's see...where are we?

The collar, which I didn't need to be so afraid of, is in.

Coat collar

After thinking about a few options, I decided to use weft-insertion interfacing in the collar and stand. To give the collar a bit of a roll, I used a lot of steam - first on just the undercollar, and then on the whole collar (upper and under) after it was together. After attaching the stand to the collar, I attached it around my pressing ham with pins, steamed the whole thing and let it sit overnight. I don't know how much of a difference that all made, but it didn't hurt anything.

Coat collar

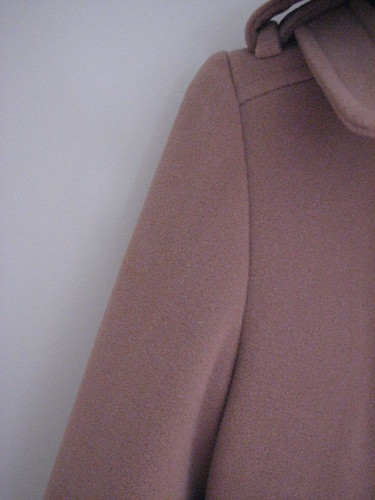
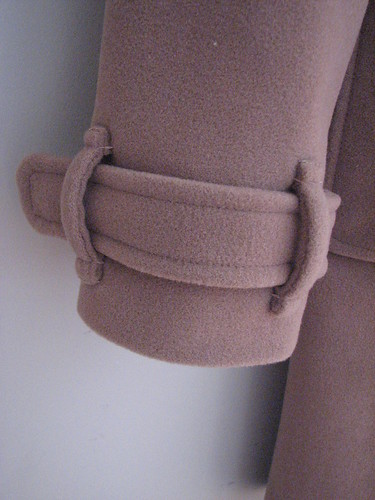
The sleeves are set in with sleeve heads and shoulder pads.

Coat sleeve

They're also hemmed and lined.

Coat sleeve

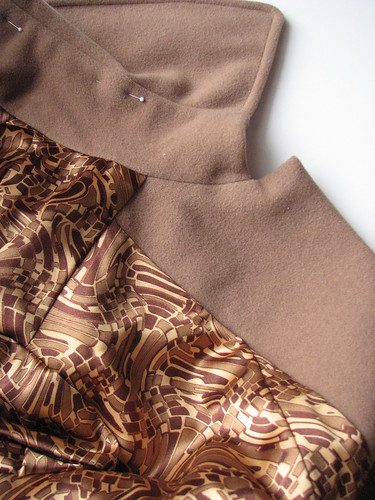
The lining is partly inserted.

Coat progress
The colors of the coat and lining are truest in this picture.

All that is left is hemming, completing the lining and some top-stitching (and buttons and buttonholes, but I'm not including that right now). The next post should be the completed coat!

Comments

  1. Wow! Gorgeous coat! It looks so RTW. Beautiful sewing.

    ReplyDelete
  2. Your coat looks gorgeous so far! Can't wait to see the finished garment!

    ReplyDelete
  3. Wow Renee, your coat is looking really good! Can't wait to see it done.

    ReplyDelete
  4. I just came across your blog this weekend. Your coat looks fabulous so far. I can't wait until it's finished.

    ReplyDelete
  5. Beautiful! Those belt loops on the sleeve look so nice. Were they tricky to sew with so many layers?

    ReplyDelete
  6. Wow, this is looking so professional! Great job so far.

    ReplyDelete
  7. You did a great job on the sleeves. Very nice!

    ReplyDelete
  8. Hello Renee! I just found your blog and am really impressed with your coat! I've never sewn a coat before, but it strikes me a pretty skilled thing to do. Yours looks great so far. It also looks like a complicated design. Your top stitching and the details make it look really professional. I am looking forward to the "big reveal" when we see your finished coat.

    ReplyDelete

Post a Comment

Popular posts from this blog

Grocery Bags

More gifts! These are just like the still-all-too-ubiquitous plastic grocery bags, but they're fabric.  I followed this tutorial and you actually use a plastic bag as a pattern.  The instructions are very good and include a pocket so that the bag can be folded up and is easy to keep in a purse or a car's glove box. Mostly for the sake of the gift recipients, here's how to fold up the bag.... 1.  Lay the bag pocket side down and fold it length-wise using the edges of the pocket as a guide. 2.  Fold it in half, aligning the top of the handles with the bottom of the bag. 3.  Fold in half again and then reach into pocket with your hand and turn the whole thing (pocket included) inside out. Happy shopping!

Shopping Bags

Most stores in our town charge you a nickel for a plastic bag when you check out. I love this practice and the way that it encourages people to bring their own cloth bags or reuse their plastic ones. My habit of bringing along bags to the grocery store is well established, but I used to find myself stuck at places like the drug store or farmer's market or other impromptu stops. Then I picked up a bag at an upscale kitchen goods store that rolls up quite compactly. Now I keep that in my purse, so I always have a bag with me. I like my bag so much that I wanted to replicate it for the art sale. The final result is a hybrid of the bag I purchased and these that I made last year. The bag is a little bigger than the average plastic grocery bag. The velcro tab is used to keep the bag rolled up, but also can close the top of the bag when it is full. Most of the bag is a single layer of cotton, but the handles are faced. There is a double row of top-stitching around both edges of

The Burda Skirt Again

I'm not sure what prompted it, but awhile ago I decided that I needed a green skirt. The last time I was at Fabricland I saw this green wide-wale corduroy. I wasn't really looking for the skirt to be corduroy and the color was a little different than I was hoping for, but since I had my eyes peeled for awhile and hadn't seen anything better, I thought I'd try the corduroy. After looking for a suitable pattern, I settled on the Burda 2/2010 skirt that I've already used three times . Because of the weight and bulk of the corduroy, I didn't want to try to mess with too many details. I'll use another skirt pattern soon. Really, I will. One of the things I really like about this pattern is the pockets. This time I made the pocket facings and part of the pocket bag out of a cotton woven solid to reduce bulk. Since I'll be wearing this skirt with tights I added a lining. Adding the lining was really simple except that I cut the lining exactly the sam