A nasty case of pink eye slowed me down a bit over the weekend, but I am still working away at the coat.
Some details...
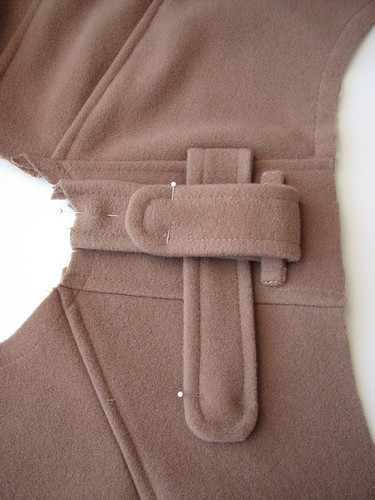
Yoke with tabs:
Pocket with flap:
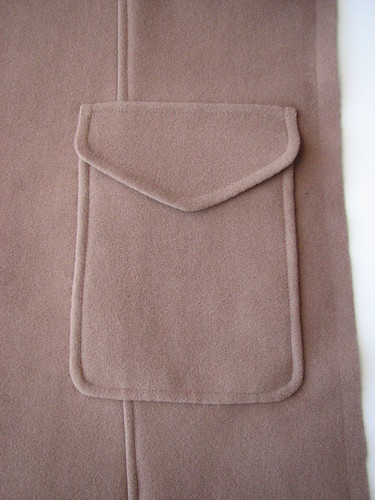
The pocket is lined. To ensure that none of the lining peeked out to the front, I slipstitched the pocket to the coat before topstitching. I placed the stitches on the underside of the folded edge of the pocket to prevent a flattened look. Burda's instructions don't include lining for the pocket, but a lined pocket feels so much nicer.
Back latch:
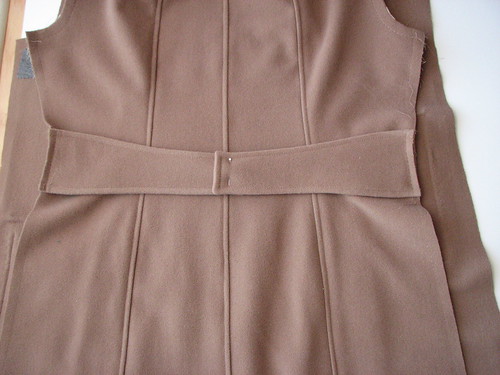
Burda calls this a "latch." North American patterns would probably call it a belt? I kind of like latch. I really like the seams on the back.
Construction thoughts...
This project is a bit of a stretch for me. My experience with tailoring and jacket/coat making is pretty minimal. It seems like something I might want to do more of someday, but right now I just don't have much need for tailored clothes in my life. So, for this coat I've been relying heavily on books and Threads articles to help me out. The problem is that this Talea pattern doesn't have the traditional tailored jacket features -the princess seams curve in toward the top on both front and back, the collar has a stand (rather than being notched), and the facing is cut on to the front. So, this has left me with more questions than answers when I try to look things up in the books or articles. How should the front be interfaced? Does it need a back stay? Is padstitching helpful for a collar on a stand?
For the most part, I'm just going with my best guess after reading about it and reminding myself that no one's life hangs in the balance if I don't get it right. I interfaced the front piece and the upper part of the side front to give the shoulder-to-bust section some support because according to Fit for Real People I have a hollow chest (which I find really discouraging for some reason. Ah, well. It's better than a hollow head. Or a hollow heart). But, I digress...
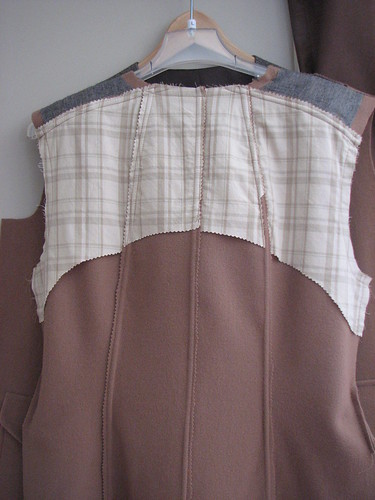
I added a back stay made from some a lightweight woven cotton. You can see the inside of the seams here. Each seam is graded and the bottom piece is trimmed with pinking shears to avoid a ridge on the right side. A couple sections of the back stay seam allowance did not get caught in the topstitching.
Moving forward...
The next part that I should be working on is the collar. I am rather intimidated by this collar.
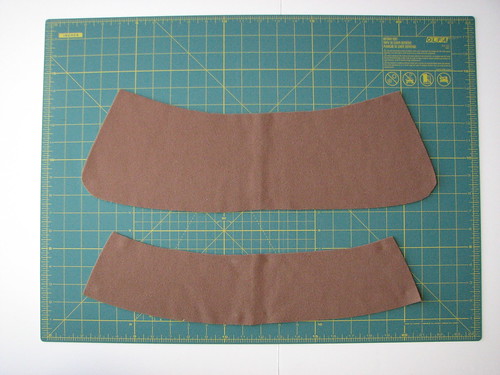
The top piece is the collar and the bottom is the collar stand. You can see they are quite large. It's pretty important that the collar lay nicely on the coat and I'm not sure what to do at this stage with interfacing or padstitching or other techniques to help it do that. Burda's instructions have you fold the under collar lengthwise and then pin the upper collar to it, but I don't know if that's going to be enough. If you have any suggestions for me, I'd love to hear them.
Now I think I'll go assemble the sleeves and do some more collar pondering.
Some details...
Yoke with tabs:
Back latch:
Construction thoughts...
This project is a bit of a stretch for me. My experience with tailoring and jacket/coat making is pretty minimal. It seems like something I might want to do more of someday, but right now I just don't have much need for tailored clothes in my life. So, for this coat I've been relying heavily on books and Threads articles to help me out. The problem is that this Talea pattern doesn't have the traditional tailored jacket features -the princess seams curve in toward the top on both front and back, the collar has a stand (rather than being notched), and the facing is cut on to the front. So, this has left me with more questions than answers when I try to look things up in the books or articles. How should the front be interfaced? Does it need a back stay? Is padstitching helpful for a collar on a stand?
For the most part, I'm just going with my best guess after reading about it and reminding myself that no one's life hangs in the balance if I don't get it right. I interfaced the front piece and the upper part of the side front to give the shoulder-to-bust section some support because according to Fit for Real People I have a hollow chest (which I find really discouraging for some reason. Ah, well. It's better than a hollow head. Or a hollow heart). But, I digress...
Moving forward...
The next part that I should be working on is the collar. I am rather intimidated by this collar.
Now I think I'll go assemble the sleeves and do some more collar pondering.
Nice work so far! I also like the new blog design!
ReplyDeleteImpressed, as usual. I too, like the new blog design!
ReplyDeleteWow! I am so impressed!
ReplyDeleteWow! This is going to one gorgeous coat!
ReplyDelete