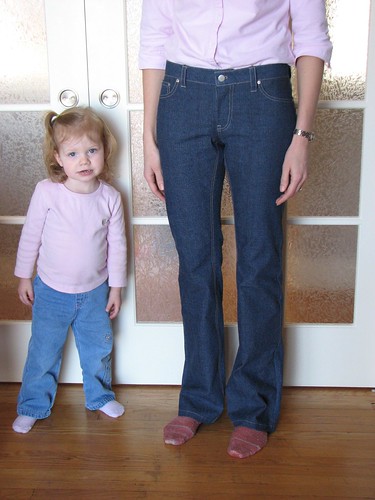
They're finished. I just looked back to see when I started these. November 17. That's a long time ago (in sewing time). I knew it would be a longer term project, but it felt a little to close to a epic project. Not that the sewing took so long, but because they were just sitting on my sewing desk all through the other projects and Christmas sewing. I'd see them and think about them, but not get to work on them. Now they're done and I wish I could say that I love them, but I don't.
Let's start with the things I do like...
The Pattern
This is the J Stern Designs Misses' Jeans pattern. It is intended to be used with regular (non-stretch) denim. The jeans are fitted with a low rise and a boot-cut leg. Optional back flap pockets are included. Overall, I thought the fit was pretty good. Of course, I did have to make some adjustments, but they weren't drastic changes. I think this is a great draft for jeans and could look very RTW.
Fly Instructions

The instructions for the fly were different than any other pants I have made, but I haven't made jeans before, so maybe these are typical for jeans. Anyway, I thought they were very good and it was easy to get a good looking fly. Wonder Tape is listed as one of the notions you need on the envelope and I think it is essential for this fly method.
Front Fit
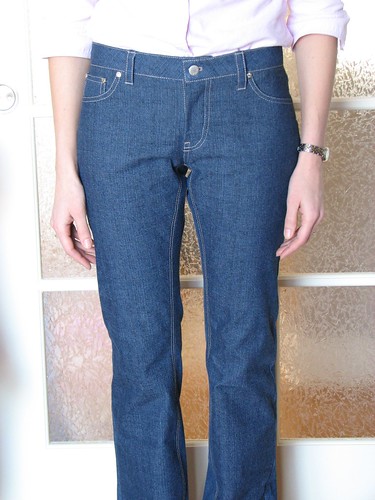
I am very happy with the fit in the front. I did have to let out the outseams a bit at the hips and the inseams a bit from 2" below the crotch to the knee.

I think I may have stretched the waistband while sewing it. It ripples a little (on the right in the picture) and it doesn't sit entirely flat where it buttons.
Back Pockets
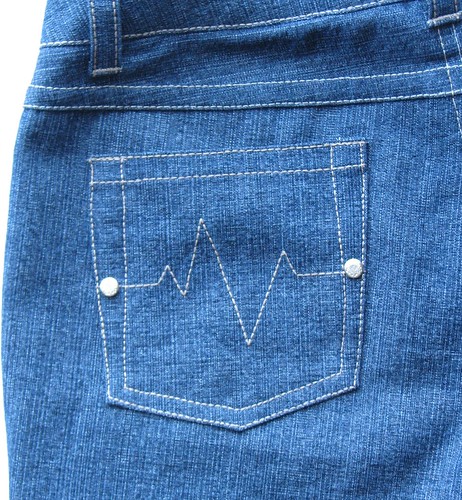
I think the back pockets on jeans are a pretty big deal. The pattern instructions say, "Back pockets make a big contribution to the personality of your jeans." I agree. Attaching the back pockets was the very last (sewing) thing I did so that I could carefully check placement and get them symmetical. I found the pattern piece would have made really large pockets, so I adjusted it (see below).
The design is kind of based on an EKG reading of a heartbeat. (The reading on my jeans would likely indicate some sort of unfortunate cardiac event). While I don't have any specific recollection, I think I may have seen this somewhere else (ETA: I did see this somewhere else! I knew this couldn't have been my original idea. Check out Mary Nanna's jeans). I think I like how they turned out.
I Made Jeans!
I've been wanting to try making jeans for awhile now. It feels good to have tried and now know what it's all about. The topstitching started out very frustrating. Sometimes my machine worked well with the upholstery thread that I chose and sometimes it wouldn't work at all. I spent a lot of time adjusting tension, rethreading, ripping out stitches, etc. While topstitching the waistband, I decided to switch to using a triple-straight stitch with regular thread. That worked much better. The thread is the same color, but you can tell the difference between the two types of topstitching. Not ideal, but by this point I knew these weren't going to be my new favorite jeans. I found the rivets quite easy to use. I pounded a hole in the jeans with a nail and hammer and then set the rivet with the setting tool. Pretty easy.

And then what I don't like...
Fit in Back

I'm not showing you myself wearing the jeans from the rear to save myself some serious embarrassment. The jeans are too tight in back. I had deemed them entirely unwearable, but have since worn them a couple of times at home and I think they might be growing on me. Literally. I think they're stretching out. I let them out as much as I could.
The Denim
I'm not so excited about this particular cut of denim. It's too blue - I'd prefer a darker wash. Also, I think it is too lightweight. That doesn't help with the too-tightness in the back. I bought the denim at least a couple of years ago thinking of trouser jeans, but never got to that. The plan was for these to be a practice pair, so this is no big loss.
Alterations:
Since I will likely try another pair, here are the changes I made (for my own sake - to check back later):

Next up: a sweater. It's cold here!!
Let's start with the things I do like...
The Pattern
This is the J Stern Designs Misses' Jeans pattern. It is intended to be used with regular (non-stretch) denim. The jeans are fitted with a low rise and a boot-cut leg. Optional back flap pockets are included. Overall, I thought the fit was pretty good. Of course, I did have to make some adjustments, but they weren't drastic changes. I think this is a great draft for jeans and could look very RTW.
Fly Instructions
Front Fit
Back Pockets
The design is kind of based on an EKG reading of a heartbeat. (The reading on my jeans would likely indicate some sort of unfortunate cardiac event). While I don't have any specific recollection, I think I may have seen this somewhere else (ETA: I did see this somewhere else! I knew this couldn't have been my original idea. Check out Mary Nanna's jeans). I think I like how they turned out.
I Made Jeans!
I've been wanting to try making jeans for awhile now. It feels good to have tried and now know what it's all about. The topstitching started out very frustrating. Sometimes my machine worked well with the upholstery thread that I chose and sometimes it wouldn't work at all. I spent a lot of time adjusting tension, rethreading, ripping out stitches, etc. While topstitching the waistband, I decided to switch to using a triple-straight stitch with regular thread. That worked much better. The thread is the same color, but you can tell the difference between the two types of topstitching. Not ideal, but by this point I knew these weren't going to be my new favorite jeans. I found the rivets quite easy to use. I pounded a hole in the jeans with a nail and hammer and then set the rivet with the setting tool. Pretty easy.
And then what I don't like...
Fit in Back
I'm not showing you myself wearing the jeans from the rear to save myself some serious embarrassment. The jeans are too tight in back. I had deemed them entirely unwearable, but have since worn them a couple of times at home and I think they might be growing on me. Literally. I think they're stretching out. I let them out as much as I could.
The Denim
I'm not so excited about this particular cut of denim. It's too blue - I'd prefer a darker wash. Also, I think it is too lightweight. That doesn't help with the too-tightness in the back. I bought the denim at least a couple of years ago thinking of trouser jeans, but never got to that. The plan was for these to be a practice pair, so this is no big loss.
Alterations:
Since I will likely try another pair, here are the changes I made (for my own sake - to check back later):
- Started with size 8.
- Change s.a. to 0.25" on inseam from 2" below crotch to knee on back pieces only.
- Taper to 0.75" s.a. at CB waist.
- Scoop out crotch 0.25" at rear.
- Trim 1/8" off each (narrow) end of yoke pieces.
- Change s.a. to 3/8" on side seams from waist to upper thigh on front and back pcs. Let out back leg at side seams 0.25".
- Back Pocket: Trim 3/8" from each (vertical) side. Remove 3/4" from bottom.
Next up: a sweater. It's cold here!!
Congratulations!! I think sewing jeans is one of those sewing milestones. They look really good, and I LOVE your EKG pockets. I may have to borrow that from you for my next pair. It's too fun! Your rivet placement is great and your topstitching looks perfect from here. I am a big fan of the triple stitch for topstitching. My machine is super finicky about thread.
ReplyDeleteI love the stitching on the back pockets! I may have to try that for my next pair of jeans. Have you tried the Jalie Jeans pattern? Many people love it--including me!
ReplyDeleteI like them! I think you look great!
ReplyDeleteGreat job, the jeans looks fantastic, as does all your topstitching.
ReplyDeleteThose jeans look fabulous on you!!!
ReplyDeleteThey look fantastic!
ReplyDeleteYour jeans look great on you. You did a wonderful job with fitting them, and all the topstitching and pockets/design.
ReplyDeleteYour jeans look great in the shots you were willing to show us! I like your EKG design.
ReplyDeleteI agree that pockets make or break the back of pants. The pants can fit perfectly, but if the pockets are the wrong size and placed incorrectly, they ruin the pants. Many people don't seem to realize that.
Those jeans look FANTASTIC! I bet the back doesn't look as bad as you think it does. And those pockets are totally fun.
ReplyDelete