
Gingham Shirt

I made this shirt back in early spring. My wardrobe needed something fresh and I really just wanted to make a shirt. It's nice to end up with a lovely product, but when it comes to shirtmaking, I really just love the process. The original pattern is Burda 04/2010 #114, but I've used it multiple times and made several changes.
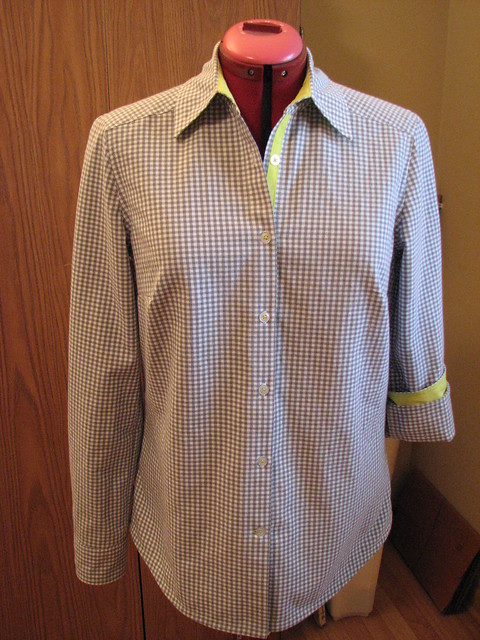
Burda 04/2010 #114

The gingham is not really the ideal weight for a classic shirt. It's more like quilting cotton - not real fine and a little spongy. It is nice quality and was pleasant to work with, but the bulk was a little frustrating at some parts of the process.
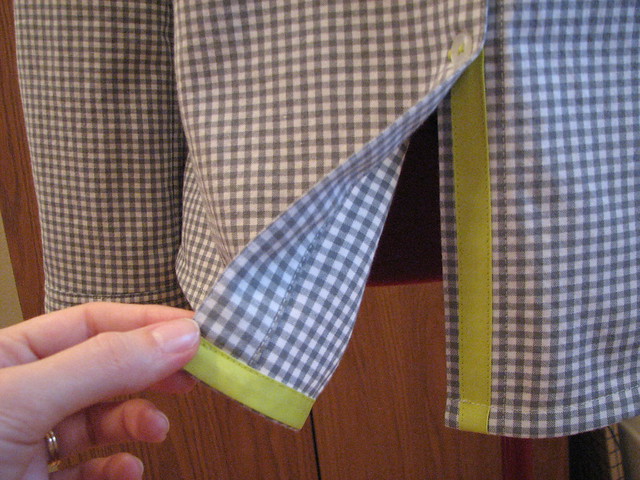
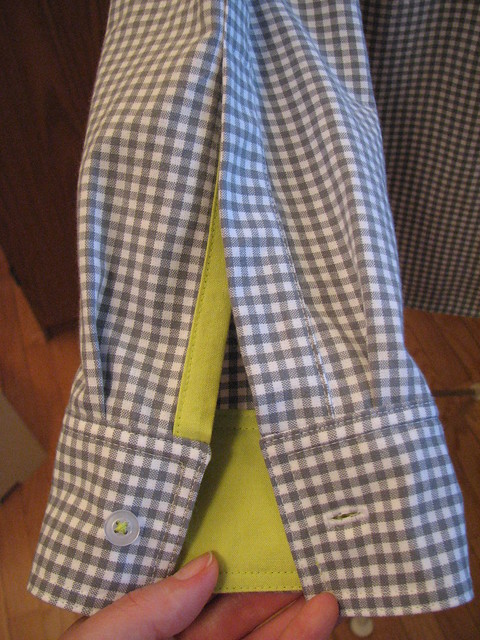
Burda 04/2010 #114

I added some bright yellow-green accents to the shirt. The color isn't accurate in any of these pictures. I had both yardage and bias tape in the exact same color. That was a surprise to me (I guess I really like that color…) but I made use of both of them.

Burda 04/2010 #114

I did consider binding the hem with the tape so that it showed on the outside of the shirt, but decided against it. The other details are more subtle and I thought the hem should be as well.

Burda 04/2010 #114

I used a two-piece sleeve placket because I wanted the overlap and underlap to be different. There was a lot of changing bobbin and needle threads in this project to make sure that the thread matched the fabric where it would show.

Burda 04/2010 #114


I made some alterations to this pattern from the last time I made it - adding some extra room and doing a full bust adjustment. I did not get the bust darts in the right place. I don't notice it as much when it's on, but it's clear in this picture that they are too low. The fabric didn't make it easy to get a nice smooth dart, either. A princess seamed shirt is probably the way to go, but I still prefer the more relaxed look of a seamless front.

Comments

  1. I absolutely LOVE this!!!

    I was just thinking I wanted blue gingham with peach accents. Soon :)

    Your details are so spot on. And as much as I like the fit on s princess seamed blouse, my TNT shirt is darted! And a Burda (envelope pattern)

    ReplyDelete
  2. Love your shirt. Great attention to detail. Good work!
    See me @ www.sewplus.blogspot.com

    ReplyDelete
  3. Very nice! The contrasting color inspires me on the next blouse.

    ReplyDelete
  4. That pop of yellow-green really makes the shirt very special. Bravo!

    ReplyDelete

Post a Comment

Popular posts from this blog

Grocery Bags

More gifts! These are just like the still-all-too-ubiquitous plastic grocery bags, but they're fabric.  I followed this tutorial and you actually use a plastic bag as a pattern.  The instructions are very good and include a pocket so that the bag can be folded up and is easy to keep in a purse or a car's glove box. Mostly for the sake of the gift recipients, here's how to fold up the bag.... 1.  Lay the bag pocket side down and fold it length-wise using the edges of the pocket as a guide. 2.  Fold it in half, aligning the top of the handles with the bottom of the bag. 3.  Fold in half again and then reach into pocket with your hand and turn the whole thing (pocket included) inside out. Happy shopping!

Shopping Bags

Most stores in our town charge you a nickel for a plastic bag when you check out. I love this practice and the way that it encourages people to bring their own cloth bags or reuse their plastic ones. My habit of bringing along bags to the grocery store is well established, but I used to find myself stuck at places like the drug store or farmer's market or other impromptu stops. Then I picked up a bag at an upscale kitchen goods store that rolls up quite compactly. Now I keep that in my purse, so I always have a bag with me. I like my bag so much that I wanted to replicate it for the art sale. The final result is a hybrid of the bag I purchased and these that I made last year. The bag is a little bigger than the average plastic grocery bag. The velcro tab is used to keep the bag rolled up, but also can close the top of the bag when it is full. Most of the bag is a single layer of cotton, but the handles are faced. There is a double row of top-stitching around both edges of

The Burda Skirt Again

I'm not sure what prompted it, but awhile ago I decided that I needed a green skirt. The last time I was at Fabricland I saw this green wide-wale corduroy. I wasn't really looking for the skirt to be corduroy and the color was a little different than I was hoping for, but since I had my eyes peeled for awhile and hadn't seen anything better, I thought I'd try the corduroy. After looking for a suitable pattern, I settled on the Burda 2/2010 skirt that I've already used three times . Because of the weight and bulk of the corduroy, I didn't want to try to mess with too many details. I'll use another skirt pattern soon. Really, I will. One of the things I really like about this pattern is the pockets. This time I made the pocket facings and part of the pocket bag out of a cotton woven solid to reduce bulk. Since I'll be wearing this skirt with tights I added a lining. Adding the lining was really simple except that I cut the lining exactly the sam