When I thought through my spring sewing plans, I came up with five things I really wanted to make for myself. That was the short list and I'm not sure I will actually make it happen, so I thought I would start with the most involved project. If I left it for the end it certainly wouldn't have gotten done.
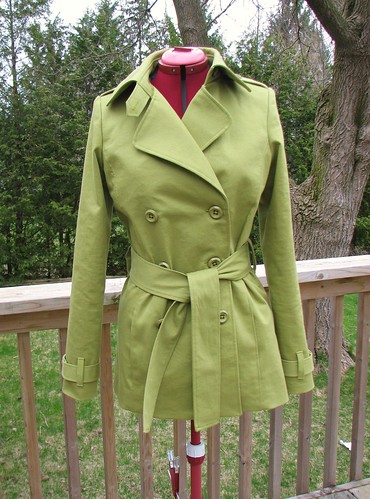
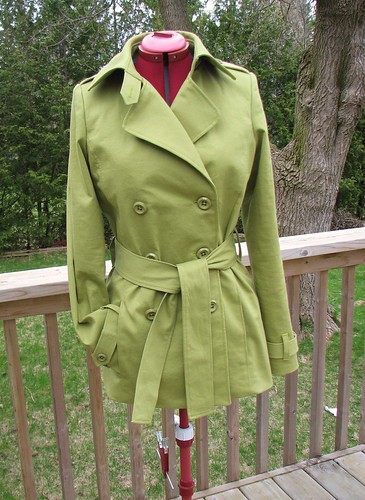
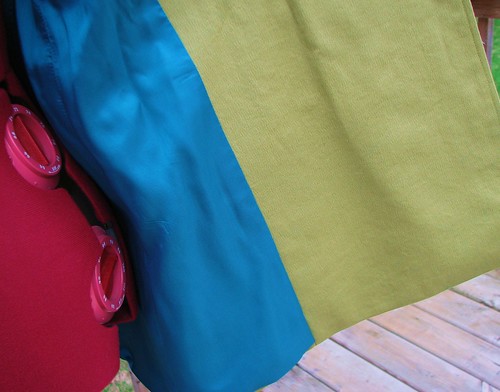
This is McCall's 5525 in my very favorite color - sour apple green. The pictures don't really show the color accurately. It's pretty bright, but I love it. I should have noted the date when I actually started this project because it feels like it took me forever - partly because I just didn't have significant chunks of time to work on it and partly because I did some tailoring work on the lapels and the collar. That meant that I had hours invested before doing any assembly.
I haven't done much classic tailoring work at all up until now. This book was a big help to me and I followed the machine method outlined in it. I also referred to this book and used some of the tips King offers. While it is time consuming, I really liked doing the tailoring and I will do more of it. I love how the lapel rolls so beautifully when it's taped and steamed and the structure and support that the hair canvas gives along the front and across the chest. Just writing about it makes me want to go do more right now!
Before making a muslin I made some basic changes to the pattern:
-added 2" of length to the body
-added 1" of length to the sleeve
-removed a bit of sleeve cap ease
After making the muslin, I made some more changes:
-added 1" more length to sleeve
-took a lengthwise tuck down the back piece from shoulder to hem for narrow shoulders
-increased the pocket size
The pocket is the only thing about the finished jacket that I'm not all that impressed with. I enlarged the pocket pattern piece in both directions and I think I should have adjusted the placement of the pocket accordingly. It seems too low in the seam and it wants to droop. The pattern was so small it seemed useless, but maybe that's the size that it works best as.
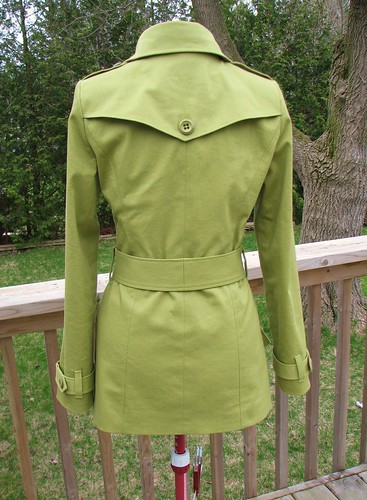
I completely forgot about the front yoke flap. I wasn't paying attention to the pattern directions and was well past the step where it should have been added by the time I noticed. I think I would have liked the look of it included, but not enough to do all the ripping that would have been necessary. Something about the back flap sure makes me happy, though.

Here you can see the epaulets and the collar tab. I like these little details. The buttons match better in real life. The collar is a good shape and size.
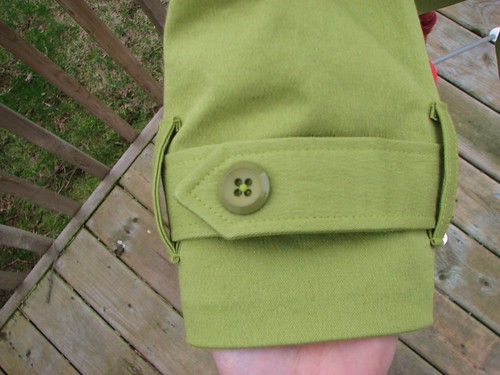
Since I wasn't reading the directions, I messed up these sleeve tabs on the first go. I assumed they would be caught in the sleeve seam and then tacked down with a button. Instead, they are sleeve bands (not tabs) and go all around the sleeve.
This picture makes it look like the jacket is lined right to the lower edge, but it isn't. I again used this tutorial for a great finish at the facing/lining/hem juncture.
I'm so happy to have this finished - both so I can wear it and so I can move on to the next thing on my spring sewing list!
This is McCall's 5525 in my very favorite color - sour apple green. The pictures don't really show the color accurately. It's pretty bright, but I love it. I should have noted the date when I actually started this project because it feels like it took me forever - partly because I just didn't have significant chunks of time to work on it and partly because I did some tailoring work on the lapels and the collar. That meant that I had hours invested before doing any assembly.
I haven't done much classic tailoring work at all up until now. This book was a big help to me and I followed the machine method outlined in it. I also referred to this book and used some of the tips King offers. While it is time consuming, I really liked doing the tailoring and I will do more of it. I love how the lapel rolls so beautifully when it's taped and steamed and the structure and support that the hair canvas gives along the front and across the chest. Just writing about it makes me want to go do more right now!
-added 2" of length to the body
-added 1" of length to the sleeve
-removed a bit of sleeve cap ease
After making the muslin, I made some more changes:
-added 1" more length to sleeve
-took a lengthwise tuck down the back piece from shoulder to hem for narrow shoulders
-increased the pocket size
The pocket is the only thing about the finished jacket that I'm not all that impressed with. I enlarged the pocket pattern piece in both directions and I think I should have adjusted the placement of the pocket accordingly. It seems too low in the seam and it wants to droop. The pattern was so small it seemed useless, but maybe that's the size that it works best as.
I completely forgot about the front yoke flap. I wasn't paying attention to the pattern directions and was well past the step where it should have been added by the time I noticed. I think I would have liked the look of it included, but not enough to do all the ripping that would have been necessary. Something about the back flap sure makes me happy, though.
Here you can see the epaulets and the collar tab. I like these little details. The buttons match better in real life. The collar is a good shape and size.
This picture makes it look like the jacket is lined right to the lower edge, but it isn't. I again used this tutorial for a great finish at the facing/lining/hem juncture.
I'm so happy to have this finished - both so I can wear it and so I can move on to the next thing on my spring sewing list!
Spectacular jacket, I love this pattern.
ReplyDeleteSharp looking coat!
ReplyDeleteYour jacket looks awesome. Such a lovely colour - I am sure you will get lots of wear from it.
ReplyDeleteBeautiful! Love the details, especially the back flap and colour. Stunning jacket!
ReplyDeleteI love this pattern! You did a great job. I wish this pattern was not discontinued! I can't find it anywhere!
ReplyDeleteRene, this is beautiful. I have the same pattern and had wanted to make a soft yellow jacket. I just can't find what I want here in Sheboygan and what I tried ordering online turned out neon.
ReplyDeleteLovely coat and great blog. :)
Gorgeous jacket, nice work!
ReplyDeleteWow. Great job. I love the fabric and the colour.
ReplyDeleteGorgeous trench. You did a beautiful job on it.
ReplyDeleteBeautiful jacket! I look forward to seeing what's next on your list:)
ReplyDeleteYou did an amazing job on this jacket.
ReplyDeleteThe color and all The details are perfect and I love the back yoke too.
This has been on my to do list since it came out and I
Want to do mine in a bright pink!
Maybe I'll have mine done for next spring:)
Gorgeous coat - love the collar and your finishing is perfect!
ReplyDelete