I have more fabric than will fit in my fabric closet. It seems that a purge and reorganizing effort is on the horizon. But, before I get to that, I've queued up projects for some of the bulkier fabrics. I need the space that they take up. The first of these projects is a new coat for me!
The fabric...
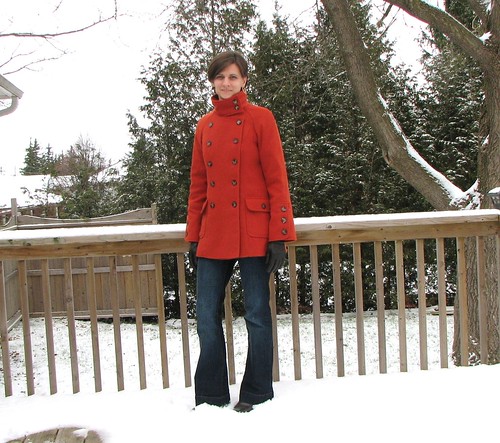
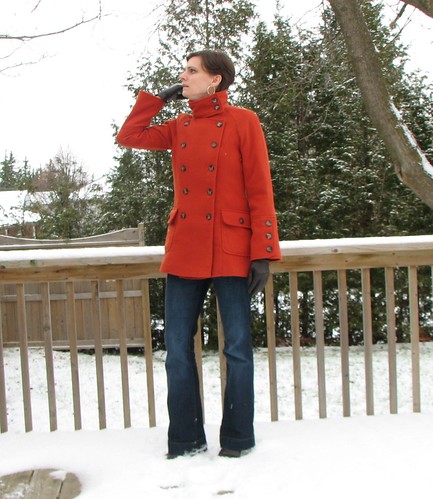
I purchased this orange coating fabric over a year ago when all the clearance fabrics at Fabricland were $1.00/meter. However, this is not a high-quality piece of fabric. It is mostly polyester and I don't expect it to wear well. I suspect it will pill. For that reason, I didn't invest a lot of time in the construction. Also, I'm thinking that I might get tired of an orange coat more quickly than something neutral, so I didn't see the need to use lots of elaborate techniques on this project.
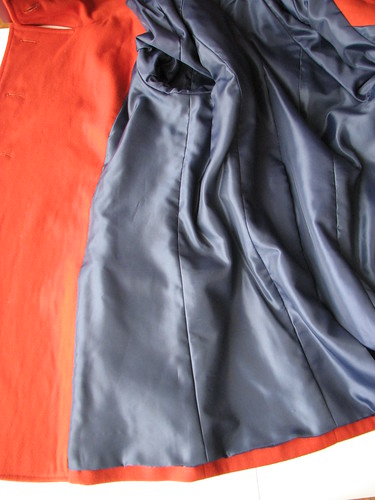
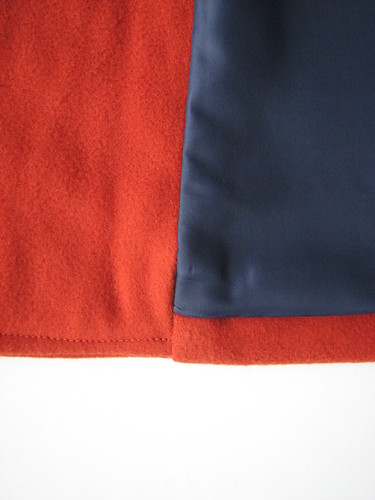
The lining fabric was given to me by a destashing acquaintance. It isn't particularly fabulous, but it was on hand and perfectly serviceable. The entire coat is underlined with flannel for extra warmth. I should have taken a picture of the underlining. There are three different types of flannel included. No one piece was large enough. Stashbusting! I'm impressed with how much the flannel helps with warmth. Warm is good. We're getting snow and it feels like winter is definitely here.
The pattern...
Simplicity 2508 was the pattern I was originally going to use for this coat, so I had already made a muslin. Thankfully, I still had it. I had not made any changes to the muslin, so that's where I started. I'm 5'8" and everything about this coat was too short. I lowered the bust point, lengthened the sleeves, lowered the back tab (which originally looked more like it was spanning my shoulder blades than my waist) and added overall length to the jacket at the hem.

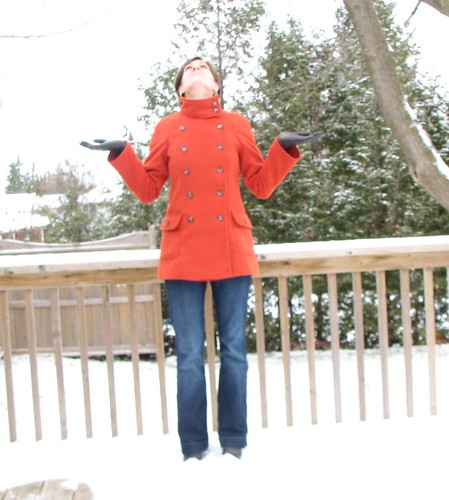
The raglan sleeve style is easier to construct than a set-in sleeve. There are many options included with this pattern and I think one could make a few very different looking coats from the same pattern. I particularly like these wide buttoned sleeve bands.

The construction...
I didn't really use any tailoring techniques on this coat. The fronts and front facings are fully interfaced with a lightweight fusible. In hindsight, it seems that it would have been smart for me to interface all of the main pieces. My biggest concern was whether or not the buttonholes would turn out to be any good. A plane ticket to NY for a visit to Jonathan Embroidery is not an option right now. I tried a few different settings and they turned out pretty well when I stitched them twice. The first pass was at a lower density and then I sliced them open. The second pass was done with both an increased width and density. They aren't perfect, but they did work pretty well.
I highly recommend this series of tutorials from Kathleen Fasanella at Fashion-Incubator for joining the jacket lining, hem and facing all by machine. It feels a little like a puzzle the first time, but it really works and her explanation is excellent.
The final verdict...
I really do like this coat (and the space that it has created in my fabric closet). I think I could have gone down a size, but I really like the full range of motion that the roominess allows.
Even if this isn't a coat that I'll be wearing for years and years, I'm happy to have added it to my outerwear options for now. I don't go to work each day and am often at home, so people see my coats (school runs, grocery shopping, errands, etc) more than my winter clothes. The Canadian winter is long and bleak. Perhaps this colorful option will add some warmth for me in more ways than one.
I purchased this orange coating fabric over a year ago when all the clearance fabrics at Fabricland were $1.00/meter. However, this is not a high-quality piece of fabric. It is mostly polyester and I don't expect it to wear well. I suspect it will pill. For that reason, I didn't invest a lot of time in the construction. Also, I'm thinking that I might get tired of an orange coat more quickly than something neutral, so I didn't see the need to use lots of elaborate techniques on this project.
The lining fabric was given to me by a destashing acquaintance. It isn't particularly fabulous, but it was on hand and perfectly serviceable. The entire coat is underlined with flannel for extra warmth. I should have taken a picture of the underlining. There are three different types of flannel included. No one piece was large enough. Stashbusting! I'm impressed with how much the flannel helps with warmth. Warm is good. We're getting snow and it feels like winter is definitely here.
The pattern...
Simplicity 2508 was the pattern I was originally going to use for this coat, so I had already made a muslin. Thankfully, I still had it. I had not made any changes to the muslin, so that's where I started. I'm 5'8" and everything about this coat was too short. I lowered the bust point, lengthened the sleeves, lowered the back tab (which originally looked more like it was spanning my shoulder blades than my waist) and added overall length to the jacket at the hem.
I didn't really use any tailoring techniques on this coat. The fronts and front facings are fully interfaced with a lightweight fusible. In hindsight, it seems that it would have been smart for me to interface all of the main pieces. My biggest concern was whether or not the buttonholes would turn out to be any good. A plane ticket to NY for a visit to Jonathan Embroidery is not an option right now. I tried a few different settings and they turned out pretty well when I stitched them twice. The first pass was at a lower density and then I sliced them open. The second pass was done with both an increased width and density. They aren't perfect, but they did work pretty well.
The final verdict...
I really do like this coat (and the space that it has created in my fabric closet). I think I could have gone down a size, but I really like the full range of motion that the roominess allows.
Even if this isn't a coat that I'll be wearing for years and years, I'm happy to have added it to my outerwear options for now. I don't go to work each day and am often at home, so people see my coats (school runs, grocery shopping, errands, etc) more than my winter clothes. The Canadian winter is long and bleak. Perhaps this colorful option will add some warmth for me in more ways than one.
Love your coat! It is really sharp. And from where I am, I'm loving the snow too. ;-)
ReplyDeleteI love it!
ReplyDeleteWhat a great coat! Loving the collar and the colour. And thanks to the tutorial pointer, I must check that out.
ReplyDeleteI love the cut and the rich, zingy colour. Too bad you aren't sure it will wear well. I could imagine enjoying this one for years.
ReplyDeleteI read that tutorial for joining the lining, and could not make sense of it. My linings still look a mess wear the hem joins the side facing.
I think the coat looks great and fits really well. It's the kind of coat I would purchase from a department store.
ReplyDeleteLove the colour and style of your new coat! I can't wear either the colour or the style, which makes me appreciate the finished garment even more!
ReplyDeleteI have the opposite height problem (*ahem* height deficiency) of you: I'm 5'3" on a good day! Waistlines/belts on RTW or commercial patterns tend to be about three inches or so below my hips. *sigh*
The jacket bagging tutorial on Kathleen Fasanella's website (Fashion-Incubator) is terrific. I've always done a variation of it, but hers is easier! :)
Taja
It's just awesome.
ReplyDeleteIt looks terrific, and should help cheer up those gray days:)
ReplyDeleteGreat coat! I love the colour. I really must get round to making this coat. I hadn't thought of making the short length but it looks great on you. The other coat on my shortlist is the Talea coat, so you can see we're on the same page (except for you having finished yours!) :-)
ReplyDeleteYour coat is gorgeous! I bought a rust coat from Land's End because I couldn't find any orange/rust fabric locally or online. I'm happy with it, but really had wanted to make my own. You are quite the seamstress, and with your height isn't it wonderful to have things actually fit? Well done. (Jamie told me to look at your blog and I'm glad I did)
ReplyDeleteWhat a distinctive coat! It looks fantastic on you. I think you are right about the color adding warmth to your grey winters and the wide cuff is such a nice detail.
ReplyDelete