I really wouldn't describe my style as trendy. It takes some time for my eyes to get used to something new and different. If it sticks around for awhile, then I might adopt it. Case in point: the maxi dress. I really didn't like them at first ("first" being what - three or four years ago?) and I still don't like many of them that I see. But, there have been some that I admire - enough to make me consider trying it out.
I actually chose to make a maxi dress because of the fabric I was interested in moving from the fabric closet to my clothes closet. I really wanted a dress out of this breton stripe knit that I purchased last year on a trip to New York. Initially, I was planning to make something similar to this or this but then I found a dress so much like what I was planning to make on a clearance rack at Old Navy for less than $3.00. Hard to beat that! So, then I needed to find a different idea for this fabric.

Then I started seeing several sewing bloggers making up this pattern and noticed the striped version. It seemed that my fabric would be well suited for that and would make it distinctly different from my Old Navy bargain dress.

Now that it's finished, I'm happy with how it turned out, but there were a few times where I thought it might end up as a wadder. The fabric stretches, but it doesn't have much recovery. Then the back piece is cut so that the stretch goes up and down, rather than around the body. The vertical stripes are a nice effect, as is the fabric conservation, but I was concerned about a few of things. First, would the back would just be too tight? Second, would I end up with a droopy seat after sitting given the lack of stretch recovery? Third, would the back of the dress just keep growing longer and longer?
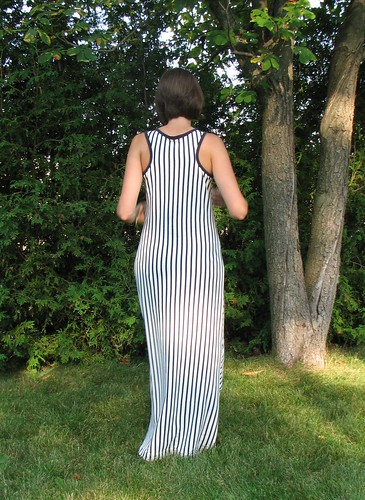
I'm happy to say "so far, so good" to all three concerns. I really didn't want the dress to be tight anywhere, so I cut the back piece one size larger than the front, but then took in the side seams a bit when sewing it up, so I guess that was unnecessary. I did let the dress hang on my dress form for a couple of weeks while the back did stretch out a bit, but it doesn't seem to still be growing. And the droopy seat doesn't seem to be a problem either. Yay! It's a win!
This pattern has been reviewed many times and I don't really have anything new to add. For mine, I raised the neckline 1.5" and wish I would have added more. I bound the neckline and armholes with a solid navy knit rather than turning and narrow hemming as the instructions suggest. As for the maxi dress factor, I don't think I'm going to be cranking these out. One is good for now. It's a unique piece and will be fun to pull out once in awhile.
I actually chose to make a maxi dress because of the fabric I was interested in moving from the fabric closet to my clothes closet. I really wanted a dress out of this breton stripe knit that I purchased last year on a trip to New York. Initially, I was planning to make something similar to this or this but then I found a dress so much like what I was planning to make on a clearance rack at Old Navy for less than $3.00. Hard to beat that! So, then I needed to find a different idea for this fabric.
Then I started seeing several sewing bloggers making up this pattern and noticed the striped version. It seemed that my fabric would be well suited for that and would make it distinctly different from my Old Navy bargain dress.
I'm happy to say "so far, so good" to all three concerns. I really didn't want the dress to be tight anywhere, so I cut the back piece one size larger than the front, but then took in the side seams a bit when sewing it up, so I guess that was unnecessary. I did let the dress hang on my dress form for a couple of weeks while the back did stretch out a bit, but it doesn't seem to still be growing. And the droopy seat doesn't seem to be a problem either. Yay! It's a win!
This pattern has been reviewed many times and I don't really have anything new to add. For mine, I raised the neckline 1.5" and wish I would have added more. I bound the neckline and armholes with a solid navy knit rather than turning and narrow hemming as the instructions suggest. As for the maxi dress factor, I don't think I'm going to be cranking these out. One is good for now. It's a unique piece and will be fun to pull out once in awhile.
That's really nice. I have the pattern, yet had no idea that the back was just one piece. When I get around to making this dress, I will piece the back so that it's similar to the front.
ReplyDeleteYour version looks great. I am considering buying this pattern for this particular view. I am glad it worked out for you.
ReplyDeleteThat is a great looking dress. I find picking patterns for no recovery knits difficult at times. This looks like a good one.
ReplyDelete