Back in the fall, I read this post from Ali and was so inspired to do exactly what she did - copy a pair of pants that I knew I liked and would wear more of. I got the book she used, Patternmaking for a Perfect Fit, from the library and set to work on a pair of well-loved trouser jeans from Gap.
The process outlined in the book is good - I'd recommend it (I've since purchased the book). I started this project in November, so I honestly don't remember a lot of the details. The only thing I do remember is that it is really important to start with the grainline and get that spot on. I didn't do that initially and I had pant legs that twisted around like a barber pole. It's a difficult part to just eyeball.
The front of the first muslin was good, but the back was a disaster. I made some adjustments and cut new back pieces. After I had the main pieces how I wanted them, I made a second muslin to test out all the small pieces that I was drafting based on measurements rather than tracing the original (waistband extension, fly guard, pocket flaps, etc). It was also helpful to practice techniques like making the welt pockets. After 2.5 muslins I was confident enough to cut into the good stuff.
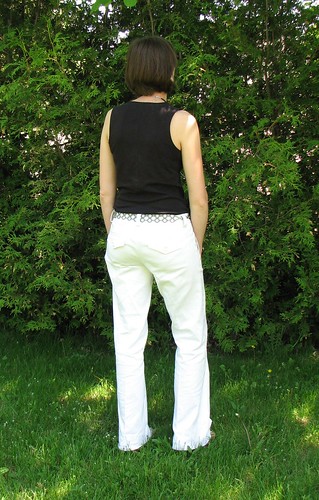
All things considered, I'm really happy with how they turned out. I used a heavy white denim with a tiny bit of stretch and I think something with a little more drape (or any drape at all) would have been better. Are these pants a perfect fit? Nope. Are they a satisfactory fit for me? You bet. Scrutinizing every wrinkle, bump, pull, or bubble sucks a lot of the joy out of sewing for me. I like a good fit, but being obsessive about it is stressful. Probably because fitting isn't my strongest skill.
Front view (with sitting wrinkles):

Rear view:
Some detail shots...
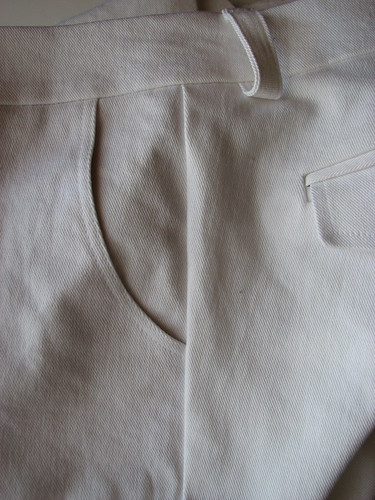
I like the shape of the front pocket opening - partly straight, partly curved. It lays smooth along my hip, but is easy to get my hands into.
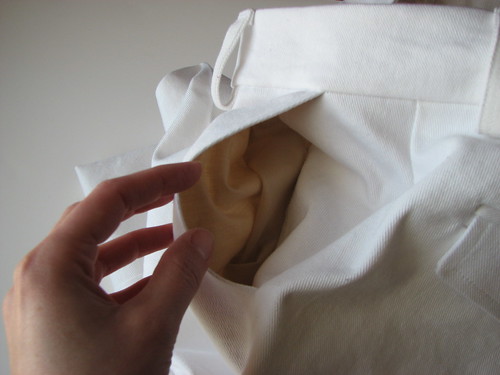
I used a lightweight beige cotton for the pocket and pocket facing to prevent show-through on the pants front. The denim is sewn on top of the pocket piece where it shows on the front.

The waistband pattern took awhile to get right, but it was worth the time. I taped the seams between the waistband and pants and at the top edge of the waistband to remove any stretch.

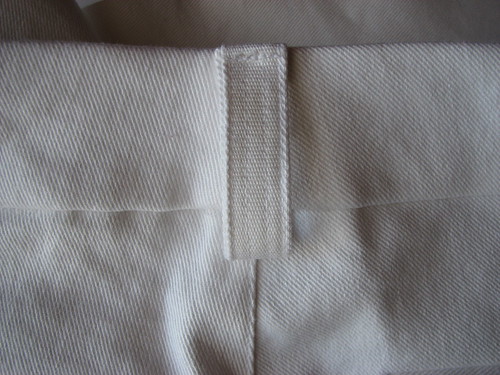
To avoid bulk at the end of the waistband, I extended it so that it folds back and attaches to the waistband facing. This way there is a fold at the end rather than a seam. Also, these hook-and-eye closures that get poked through the fabric and have a supporting plate on the backside are soooo much nicer than the kind that you stitch on. They feel more secure and allow for a smoother, flatter waistband finish. This is the first time I've used them and clearly I need some practice getting them on straight!
I often sing the praises of my Pfaff sewing machine. I wish my kids were as responsive and obedient when I make requests of them as my machine is. The only thing it struggled with on these pants was attaching the top of the center back belt loop. I used the selvage for the belt loops because I liked the subtle difference in weave, but it was harder to sew through that densely woven part. There is a seam in the waistband at CB, so there are no less than 10 layers of denim right there. It took some doing, but we finally got the belt loop attached.
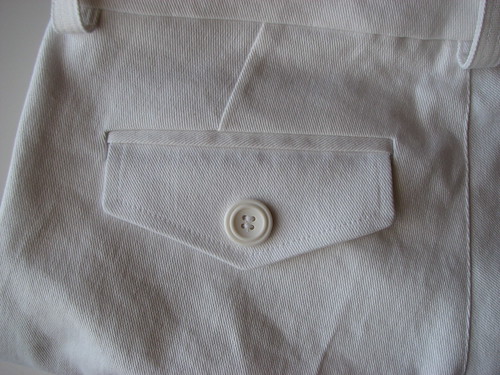
And, finally, the welt pockets with flaps. They aren't actually pockets. I don't need them to be pockets and I wanted to be sure they would stay smooth and flat. Before I make these again, I need to work on that dart placement. I'm not sure what happened there. It shouldn't be angled out to the side like that.
And there will be more pants made from this pattern. It was a long process, but I think it was less cumbersome than starting with a pattern and trying to make it what I want.
The process outlined in the book is good - I'd recommend it (I've since purchased the book). I started this project in November, so I honestly don't remember a lot of the details. The only thing I do remember is that it is really important to start with the grainline and get that spot on. I didn't do that initially and I had pant legs that twisted around like a barber pole. It's a difficult part to just eyeball.
The front of the first muslin was good, but the back was a disaster. I made some adjustments and cut new back pieces. After I had the main pieces how I wanted them, I made a second muslin to test out all the small pieces that I was drafting based on measurements rather than tracing the original (waistband extension, fly guard, pocket flaps, etc). It was also helpful to practice techniques like making the welt pockets. After 2.5 muslins I was confident enough to cut into the good stuff.
All things considered, I'm really happy with how they turned out. I used a heavy white denim with a tiny bit of stretch and I think something with a little more drape (or any drape at all) would have been better. Are these pants a perfect fit? Nope. Are they a satisfactory fit for me? You bet. Scrutinizing every wrinkle, bump, pull, or bubble sucks a lot of the joy out of sewing for me. I like a good fit, but being obsessive about it is stressful. Probably because fitting isn't my strongest skill.
Front view (with sitting wrinkles):
I like the shape of the front pocket opening - partly straight, partly curved. It lays smooth along my hip, but is easy to get my hands into.
To avoid bulk at the end of the waistband, I extended it so that it folds back and attaches to the waistband facing. This way there is a fold at the end rather than a seam. Also, these hook-and-eye closures that get poked through the fabric and have a supporting plate on the backside are soooo much nicer than the kind that you stitch on. They feel more secure and allow for a smoother, flatter waistband finish. This is the first time I've used them and clearly I need some practice getting them on straight!
And there will be more pants made from this pattern. It was a long process, but I think it was less cumbersome than starting with a pattern and trying to make it what I want.
These are amazing! The fit is fantastic and flattering, and all the construction details look so neat and perfect. Wow!
ReplyDeleteThese look amazing! Beautiful work.
ReplyDeleteI am so impressed!! I would love to just once make a great fitting pair of pants. I am going to look into making my own pattern.
ReplyDeleteWhat a fantastic result. The fit and details are excellent.
ReplyDeleteAll the details are brilliantly executed. This is a very nice looking pair of white pants!
ReplyDeleteI would be very happy to achieve the fit you have! The pants look great and all your finishing details are lovely.
ReplyDeleteThese look amazing! I have been looking for hooks like that....where did you get them from??
ReplyDeleteI purchased mine in NYC at Steinlauf and Stoller, I think. I haven't been able to find them locally - a shame because I'm going to need more soon! I haven't looked into a good online source yet.
DeleteGorgeous!
ReplyDeletethey look great!!!!!!!
ReplyDeletelove the front waistband idea.
Incredible work! Everything is impressive, but I especially like the back pockets. You are in inspiration!
ReplyDelete