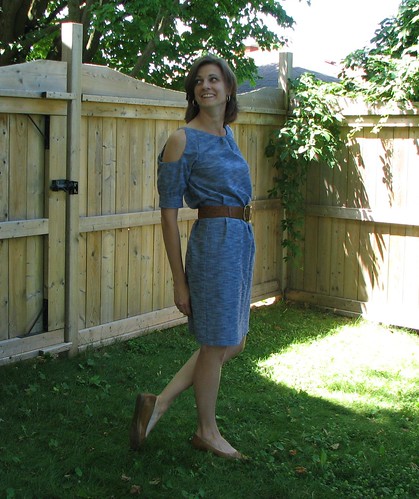
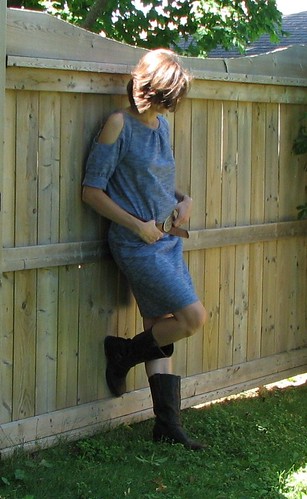
After some ambivalence about the last dress I made, I'm happy to be able to say that I made another (somewhat unique) one and am really happy with this one.
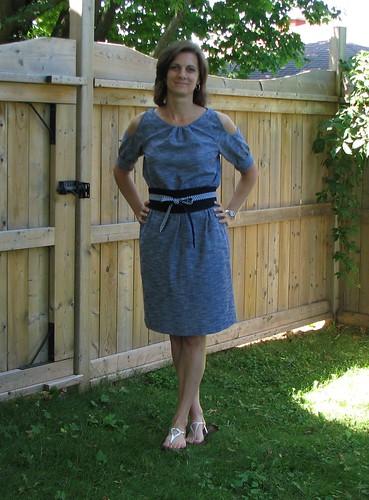
This is Simplicity 2406 made up in some of the chambray that I bought in NYC. I love the fabric, so I'm especially pleased that I really like the final result. There are always so many possibilities before the fabric is cut into. Once it's cut, that's it. Getting to rejoice over the pattern choice is so much nicer than grieving over it.
This is a pretty simple dress. Construction was very straightforward. It's pretty much a sack and requires a belt or sash for any sort of shaping. I liked the "cold shoulder" views on the pattern, but didn't care for the way the short sleeves stick out below the opening - just a personal preference. So, I added some length and a cuff.
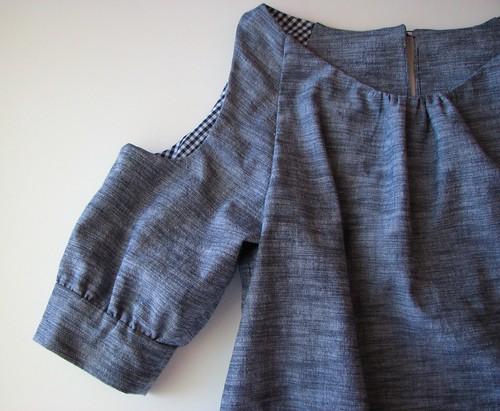
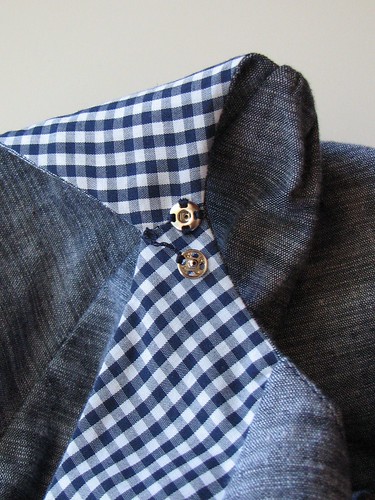
The shoulder openings are finished with facings. I cut those from navy and white gingham. The shoulder, front and back facings all meet up for a clean and entirely machine-sewn finish.
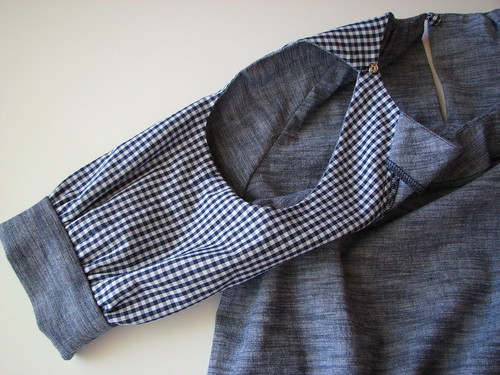
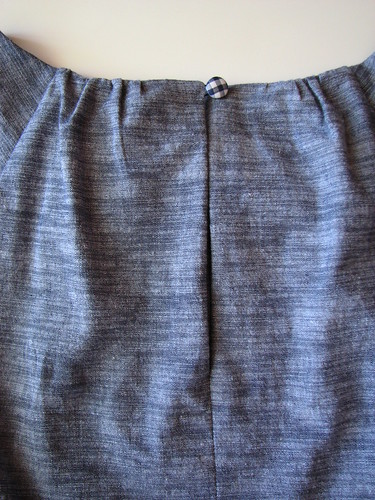
The pattern includes a slit that opens all the way to the waist in the back. That wasn't really going to work for me, so I shortened it dramatically. I finished the top with a gingham-covered button and thread chain loop, but it isn't necessary at all. I can get it on and off without undoing it.
With the back slit partly closed up, there are no problems with wearing a regular bra with this dress. However, the amount of dress that is actually on my shoulders isn't a lot, so I added lingerie guards. Lingerie guards are to your bra strap as belt loops are to your belt.
To make these, I stitched the socket half of the snap down on the neck side of the opening. Then I made a thread chain and attached the ball half of the snap to it. Smaller snaps would have been a better choice, but they weren't worth a special trip to the store. These were on-hand and do the job well enough.
The pattern does include a sash, but you should note that the sash is listed separately in the yardage requirements. The sash is nice, but I wanted something other than chambray at the waist, so I made the obi belt. (I'll write about that in the next post.) I liked it, but thought it might not be the only way to go.
Hmmm...fun to have options. It would be fun to do something in red, too, but I have very little red in my closet.
This is a pretty simple dress. Construction was very straightforward. It's pretty much a sack and requires a belt or sash for any sort of shaping. I liked the "cold shoulder" views on the pattern, but didn't care for the way the short sleeves stick out below the opening - just a personal preference. So, I added some length and a cuff.
The shoulder openings are finished with facings. I cut those from navy and white gingham. The shoulder, front and back facings all meet up for a clean and entirely machine-sewn finish.
The pattern includes a slit that opens all the way to the waist in the back. That wasn't really going to work for me, so I shortened it dramatically. I finished the top with a gingham-covered button and thread chain loop, but it isn't necessary at all. I can get it on and off without undoing it.
To make these, I stitched the socket half of the snap down on the neck side of the opening. Then I made a thread chain and attached the ball half of the snap to it. Smaller snaps would have been a better choice, but they weren't worth a special trip to the store. These were on-hand and do the job well enough.
navy obi and sandals?
tan belt and flats?
big buckle belt and cowboy boots?
I love it! Especially with the tan belt. Very versatile and a good choice for the fabric.
ReplyDeleteI LOVE this dress!! Particularly the "cowgirl" style. So cute!!
ReplyDeleteWow! I love it. You're version is making me reassess this pattern. I like it the obi belt, but the brown belt really makes it pop. Nice job.
ReplyDeleteI too love this dress! It is a unique dress and it looks amazing on you.
ReplyDeleteOK you are convincing me to make a dress.
ReplyDeleteJust found your blog! I have this pattern, but haven't tried it yet. It looks great and I love what you have done with the sleeves. I also love the obi belt, another thing on my to do list. Michele.
ReplyDelete