I don't wear many blouses or shirts made from woven fabrics. For comfort and ease of fitting and wear, I generally prefer knits. But, there is one traditional button-up shirt in my closet that I do like and wear regularly. This shirt came off the clearance rack at Kohl's about 7 years and 10 pounds ago. It no longer looks good on a hanger or on me and needs a replacement.
The reason I liked this particular shirt is because it didn't restrict my arm movement or pull across my back when I would reach for something. The armholes were cut quite high and the sleeves were pretty slim. The style was pretty classic and casual - yoke, collar and stand, bust darts in the front, vertical darts in the back, placket and cuffs.
Since the fit wasn't so great anymore, I couldn't just use the original as a pattern. Instead, I looked for a similar pattern and figured I would just need to do a lot of tweaking. Burda 04/2010 #114 was my pattern of choice. It doesn't have back darts, but I figured those are pretty easy to add.
Based on my measurements, I started with a size 38 and added 1" to the sleeve length before cutting out my muslin. Alterations I made to the muslin:
The finished shirt is very basic and I'm considering it only the second step in a bigger project of tweaking this pattern to be exactly what I want. I'll need to wear it a bit before I know what else needs to be changed. And I'll need pictures of it on me, since that highlights fitting issues so much. But, I don't have any of those right now.

For now, I'm just really happy with the construction of the shirt. Other than fitting changes, I also used my muslin to test different techniques that I wanted to use to improve my shirtmaking skills. It was fun to research (mostly online) different methods and choose one or two to try. There are so many different ways to do things!
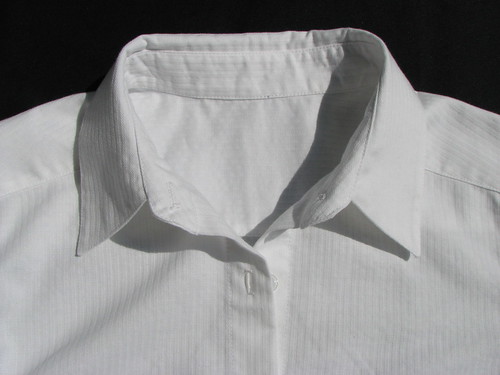
For the collar and stand, I used Gigi's tutorial. It is a great way to get the spot at the bottom corner of the stand (where it meets the shirt center front) finished neatly. That's always the toughest spot for me.
For the sleeve placket, I used the instructions from a Threads article in Issue #139. The instructions in Shirtmaking, by David Page Coffin are similar. This tutorial is also excellent using the same method.
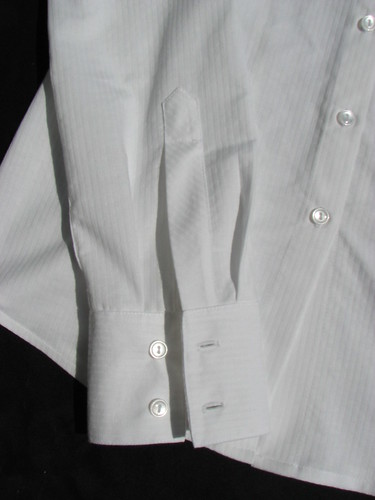
For the cuffs, I used the instructions in Shirtmaking. It is basically the same idea as the collar stand in the tutorial mentioned above. Again, the corners come out really nicely.
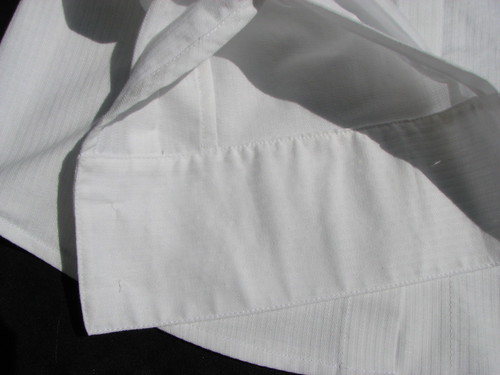
When I traced the Burda pattern, I added varying seam allowances based on how that part was finished or connected to another part. This was something new for me, but it makes a lot of sense, I think. Anything that is enclosed (collar, stand, cuffs, yoke) got a 1/4" seam allowance. I wanted to flat-fell the vertical seams (sleeves, sides, center back) so those were 5/8".
I was hoping to use Pam's tutorial for flat felling the arm scye, but I had a difficult time getting it smooth, particularly on the inside. I think it would work great for a shirt with a flatter cap. I left those seam allowances at 1/2", serged them and then topstitched. It felt a little like cheating compared to the finishes on the rest of the shirt, but I'm okay with that.
I realize the pictures aren't all that great. The sun was so bright on the day that I took them that I could hardly see when I finished and came in the house. Looking at the white shirt in the sun was nearly blinding! I could have waited until another day, but I find white almost as difficult to photograph as black regardless of the light.
The reason I liked this particular shirt is because it didn't restrict my arm movement or pull across my back when I would reach for something. The armholes were cut quite high and the sleeves were pretty slim. The style was pretty classic and casual - yoke, collar and stand, bust darts in the front, vertical darts in the back, placket and cuffs.
Since the fit wasn't so great anymore, I couldn't just use the original as a pattern. Instead, I looked for a similar pattern and figured I would just need to do a lot of tweaking. Burda 04/2010 #114 was my pattern of choice. It doesn't have back darts, but I figured those are pretty easy to add.
Based on my measurements, I started with a size 38 and added 1" to the sleeve length before cutting out my muslin. Alterations I made to the muslin:
- lowered the bust darts by 0.25"
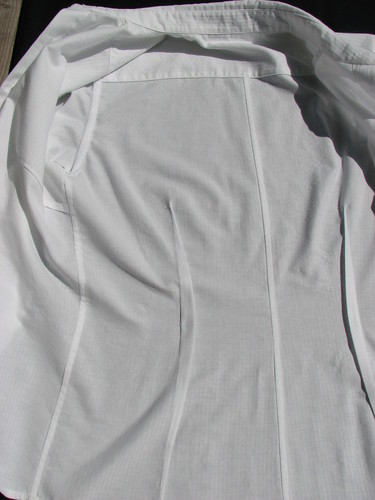
- added back darts
- took in side seams at waist by 1" on each side
- took a 1" horizontal tuck at back waist (converted to a CB seam with shaping)
The finished shirt is very basic and I'm considering it only the second step in a bigger project of tweaking this pattern to be exactly what I want. I'll need to wear it a bit before I know what else needs to be changed. And I'll need pictures of it on me, since that highlights fitting issues so much. But, I don't have any of those right now.
For now, I'm just really happy with the construction of the shirt. Other than fitting changes, I also used my muslin to test different techniques that I wanted to use to improve my shirtmaking skills. It was fun to research (mostly online) different methods and choose one or two to try. There are so many different ways to do things!
For the collar and stand, I used Gigi's tutorial. It is a great way to get the spot at the bottom corner of the stand (where it meets the shirt center front) finished neatly. That's always the toughest spot for me.
For the sleeve placket, I used the instructions from a Threads article in Issue #139. The instructions in Shirtmaking, by David Page Coffin are similar. This tutorial is also excellent using the same method.
When I traced the Burda pattern, I added varying seam allowances based on how that part was finished or connected to another part. This was something new for me, but it makes a lot of sense, I think. Anything that is enclosed (collar, stand, cuffs, yoke) got a 1/4" seam allowance. I wanted to flat-fell the vertical seams (sleeves, sides, center back) so those were 5/8".
I was hoping to use Pam's tutorial for flat felling the arm scye, but I had a difficult time getting it smooth, particularly on the inside. I think it would work great for a shirt with a flatter cap. I left those seam allowances at 1/2", serged them and then topstitched. It felt a little like cheating compared to the finishes on the rest of the shirt, but I'm okay with that.
I realize the pictures aren't all that great. The sun was so bright on the day that I took them that I could hardly see when I finished and came in the house. Looking at the white shirt in the sun was nearly blinding! I could have waited until another day, but I find white almost as difficult to photograph as black regardless of the light.
I'd say you aced the construction of this shirt. You did an awesome job...every detail looks perfect :)
ReplyDeleteWhat a fabulous work you've done!
ReplyDeleteAwesome! Do you have "Shirtmaking"? If not, would you like to have a copy?
ReplyDeleteEleanor