My time in New York City was fantastic. Just incredible. The Preacher and I had a day together to do some sight-seeing and then I had two days to myself in the garment district while he was at a conference.
On the first of my "just me" days, my top priority was finding buttons for my coat and getting the buttonholes done at Jonathan Embroidery. I chose buttons from Pacific Trimming. I had a hard time deciding between two different buttons, so I bought enough of each for the coat. There wasn't space to spread out the coat and get a good feel for the overall look with the buttons, but I didn't want to regret a choice when I got home.
Option #1:
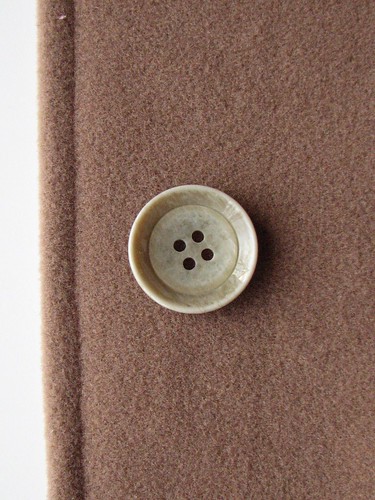
And lined up on the coat front:

Option #2:
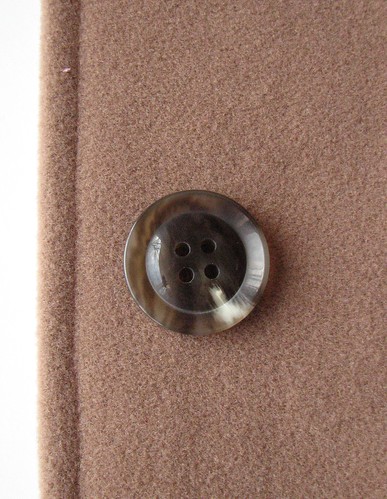
And lined up on the coat front:

Neither are what I would consider novelty buttons, but there are a lot of other details on the coat and I didn't want to overdo it. I like both of them and haven't decided which to use.
Now, about the buttonholes. If the only reason I had gone to NYC was to get these buttonholes, the trip would still have been worth it. They're perfect.
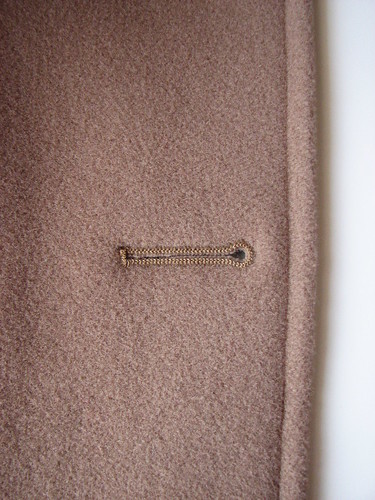
The experience of having them done was fascinating. There were two people ahead of me, so I waited maybe 10-15 minutes, but it was interesting to watch the process for their projects, too. When it was my turn, the employee chose two different weights of thread to match the coat and then went through what looked like a very complicated re-threading process on a very intricate industrial machine. It made threading my serger look really simple. The buttonholes were stitched (very quickly!) and the machine punched the eye of the buttonhole. Then the employee cleanly cut the straight part open. Threads were left for me to snip off. I paid $1.00 for each buttonhole - by far the best deal I found in the garment district.
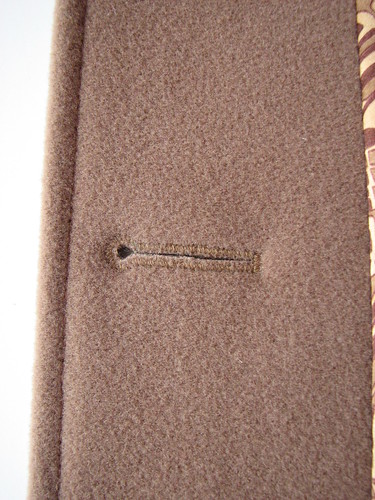
The photo above is taken from the right side of the coat and the one below is the wrong side. The heavier weight thread is on the right side.
So, that was a great start to my garment district time. Next, I'll show you all the goodies I picked up.
On the first of my "just me" days, my top priority was finding buttons for my coat and getting the buttonholes done at Jonathan Embroidery. I chose buttons from Pacific Trimming. I had a hard time deciding between two different buttons, so I bought enough of each for the coat. There wasn't space to spread out the coat and get a good feel for the overall look with the buttons, but I didn't want to regret a choice when I got home.
Option #1:
Option #2:
And lined up on the coat front:
Now, about the buttonholes. If the only reason I had gone to NYC was to get these buttonholes, the trip would still have been worth it. They're perfect.
The photo above is taken from the right side of the coat and the one below is the wrong side. The heavier weight thread is on the right side.
Awesome post! Your time in NY looks like it was fun. And those buttonholes are perfection! I would love to see what buttons you choose, they are both nice.
ReplyDeleteThose are some gorgeous button holes! I like option #2 for buttons.
ReplyDeleteHow cool!
ReplyDeleteWow! Love the pretty button holes. I am for option 1. I like how it makes the camel color of the coat standout
ReplyDeletethe button holes turned out really nice! i vote for the dark buttons from how the pictures look.
ReplyDeletecan't wait to see the rest of the stuff.
Those buttonholes are definitely worth the trip. I was so interested about the two weights of thread, also, so thanks for that idea. my opinion, for what it's worth, is option #2.
ReplyDeleteYou picked up some great buttons! Buttons can make a powerful statement on coats and it's great that you're trying to find the perfect one's!
ReplyDeleteWow, how awesome! I can't wait to see your goodies. I really like the darker buttons with your coat.
ReplyDeleteWow, I didn't know you could get buttonholes done for you; I don't think I've heard of that here in the UK. What a great job and at $1 each it saves the "buttonhole anxiety" I always suffer! I'm loving the darker buttons too.
ReplyDeletethose are amazing buttonholes. I can't believe they were $1 each, best bargain ever. I can't wait to see your finished coat. I like the darker buttons.
ReplyDeletewow.
ReplyDeleteGorgeous buttonholes!
This is where I'm sorry I live in little old Adelaide in Australia. You want custom made buttonholes. What??!
Gorgeous. I am sure you will be proud of this coat for years to come!
ReplyDelete