Early in the summer, a woman from church gave me a bag of fabric that she wasn't going to use. It was primarily quilting cotton in farm and boyish prints. This was a great addition to my stash and I've used a few of the pieces. She also included an apron that she had picked up at a farmer's market in Alberta when she was on vacation. The apron was made from an old pair of jeans. She thought it was pretty neat and wanted me to see it as maybe I would be interested in making them, also. The apron was an interesting thing to see, but it wasn't something that was going to be high on my list of things to make.
Fast forward a bit to August when I was on an uncluttering rampage. I got rid of heaps of things that were not enhancing my (or my family's) life in any way, shape or form. (Side note: I find the Unclutterer blog very inspiring. So many good ideas and insights there). Fast forward again to a few weeks ago when this woman asked for the apron back. I looked everywhere the apron could be, but I think it got caught in my rampage. I don't know exactly where it ended up, but it wasn't in my house and I wasn't hopeful about getting it back. Gulp. I explained to this woman that I did not have it anymore and apologized profusely. Apparently, she was just lending the apron to me and was going to want it back from the beginning. I missed that part of the conversation entirely. Together we decided that I would make her a new one to replace the one that I lost.
There are many tutorials out there for aprons made from old jeans, but they are all half-aprons and I know the one I was replacing was a full apron with a bib. Unfortunately, I could not remember exactly what the original looked like, so I had to come up with my own thing.

There isn't a lot that needs to be explained here. For the lower part of the apron, I generally followed the same steps as this tutorial, but I cut off the waistband at the side seams and didn't mess with the yoke (because the jeans I used didn't have one). The lower and side edges are just turned back and stitched (after serging the raw edge).
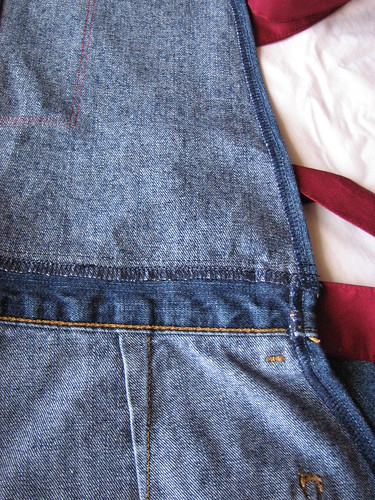
The bib part of the apron is the lower part of one of the legs - I used the pant hem as the top edge. After finishing the side edges, I lapped the lower part over the bib and top-stitched along the waistband edge.
The waist tie is not attached to the apron - just threaded through the loops and tied in the back. The neck strap is stitched on the back of the bib and is adjustable. I added the pocket just because it seemed to need something else.
I haven't given this apologetic apron to this woman yet, but I really hope she is happy enough with it. And now I know that when someone gives me something, I should ask, "Do you want it back if I don't use it or want it?" Lesson learned.
Next Up: A Christmas table runner
Fast forward a bit to August when I was on an uncluttering rampage. I got rid of heaps of things that were not enhancing my (or my family's) life in any way, shape or form. (Side note: I find the Unclutterer blog very inspiring. So many good ideas and insights there). Fast forward again to a few weeks ago when this woman asked for the apron back. I looked everywhere the apron could be, but I think it got caught in my rampage. I don't know exactly where it ended up, but it wasn't in my house and I wasn't hopeful about getting it back. Gulp. I explained to this woman that I did not have it anymore and apologized profusely. Apparently, she was just lending the apron to me and was going to want it back from the beginning. I missed that part of the conversation entirely. Together we decided that I would make her a new one to replace the one that I lost.
There are many tutorials out there for aprons made from old jeans, but they are all half-aprons and I know the one I was replacing was a full apron with a bib. Unfortunately, I could not remember exactly what the original looked like, so I had to come up with my own thing.
The waist tie is not attached to the apron - just threaded through the loops and tied in the back. The neck strap is stitched on the back of the bib and is adjustable. I added the pocket just because it seemed to need something else.
I haven't given this apologetic apron to this woman yet, but I really hope she is happy enough with it. And now I know that when someone gives me something, I should ask, "Do you want it back if I don't use it or want it?" Lesson learned.
Next Up: A Christmas table runner
I have been in similar situations myself. I applaud you for both your craftiness and your diplomacy!
ReplyDeleteAnd I think I might try this, since I have been collecting jeans for ages. (I am prone to cluttering my space with "future projects" but this one I might actually do.)
Awesome apron! What a great way to re-purpose those jeans!
ReplyDeleteGood for you...you handled this really well :)
ReplyDeleteYour version looks great and is a perfect way to re-cycle jeans.
I had been saving jeans for ages for future re-fashions but when we moved last year I donated them all to a local charity.
I will have to come up with a few more, because I really like this apron idea.
I hoped your friend liked your version just as much, or even more, than the one she originally purchased!
ReplyDeletelove it!!!
ReplyDelete