During the summer, Heidi of Handmade by Heidi generously gave away some of her scraps. I was the lucky recipient of one batch and was thrilled with what I received. One of the things in the box was a partial charm pack. If you aren't familiar with quilting, a charm pack is a set of pre-cut 5" squares - one from each piece in a fabric collection. Every time I'm in a quilt shop I look at the charm packs and am tempted to buy one, but I've never been sure what to do with them so I've never bought one.
Several weeks ago the Sew, Mama, Sew blog featured back-to-school patterns and tutorials. One from The Polka Dot Chair caught my eye and after looking at it further, I decided to try making it with the charm pack from Heidi. I really liked the T-shirt with the owl applique, too and decided to just copy the whole outfit.

Since I was working with only a partial charm pack, I had to add some squares of other fabric, but I found what I needed in Heidi's box. I did have to buy the fabric for the lower band and the waistband. While I wasn't sure I was going to like it when I bought these fabrics, I did the best I could given my choices and I'm pretty happy with the result.
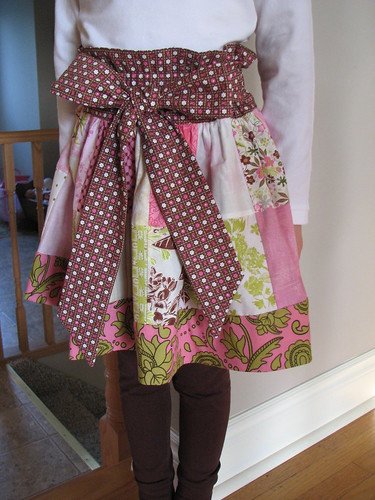
The skirt tutorial has good instructions, but I did change a couple of things. First, I sewed the squares together with my serger. The piecing isn't as accurate as I could have done with my sewing machine, but I thought the raw edges needed to be finished.

Second, I moved the elastic casing to the center of the waistband, rather than the top as suggested. I wanted the ties to cover up the elastic and look like a paper-bag waist.
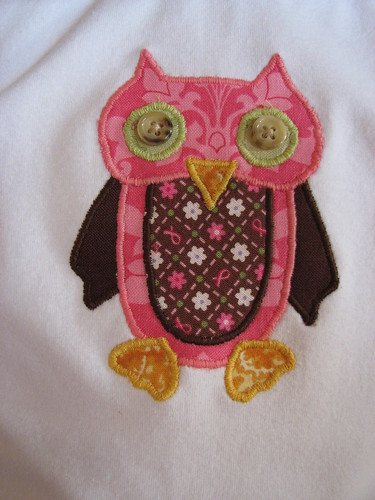
I don't do a lot of machine applique because I have a hard time getting it to look good. I'm happy with how my machine handled this one. The green around the eyes and the yellow around the feet doesn't look all that great, but those are small curved pieces that required a lot of tiny pivots.
Because the shirt is a knit, I fused a tear-away stabilizer on the back to prevent stretching and rippling. The parts of the owl are fused on with Wonder-Under. In the picture, it looks like the button eyes are really off-center. I think that is because of the angle that I was holding the camera.
And yes, those are pink breast cancer awareness ribbons on the brown owl belly fabric. Was my intention to have my six-year-old daughter make a statement about breast cancer? Nope. Like I said above, I did the best with the choices I had available.

Before I cut out the top, I contemplated doing something "different" with the sleeves to make it a little nicer than a plain white T with an owl slapped on it. I had a hard time coming up with anything I was excited about and decided to trim the neckline instead of change the sleeves. The picot-edge elastic was a good fit - stretchy, cute, and not overdone.
The T-shirt is based on Kwik Sew 2918 and the leggings are Burda 9615, both patterns I've used more times than I can count.
Several weeks ago the Sew, Mama, Sew blog featured back-to-school patterns and tutorials. One from The Polka Dot Chair caught my eye and after looking at it further, I decided to try making it with the charm pack from Heidi. I really liked the T-shirt with the owl applique, too and decided to just copy the whole outfit.
My daughter is really happy with these clothes, but you sure wouldn't know it from the picture.
The skirt tutorial has good instructions, but I did change a couple of things. First, I sewed the squares together with my serger. The piecing isn't as accurate as I could have done with my sewing machine, but I thought the raw edges needed to be finished.
I don't do a lot of machine applique because I have a hard time getting it to look good. I'm happy with how my machine handled this one. The green around the eyes and the yellow around the feet doesn't look all that great, but those are small curved pieces that required a lot of tiny pivots.
Because the shirt is a knit, I fused a tear-away stabilizer on the back to prevent stretching and rippling. The parts of the owl are fused on with Wonder-Under. In the picture, it looks like the button eyes are really off-center. I think that is because of the angle that I was holding the camera.
And yes, those are pink breast cancer awareness ribbons on the brown owl belly fabric. Was my intention to have my six-year-old daughter make a statement about breast cancer? Nope. Like I said above, I did the best with the choices I had available.
Before I cut out the top, I contemplated doing something "different" with the sleeves to make it a little nicer than a plain white T with an owl slapped on it. I had a hard time coming up with anything I was excited about and decided to trim the neckline instead of change the sleeves. The picot-edge elastic was a good fit - stretchy, cute, and not overdone.
The T-shirt is based on Kwik Sew 2918 and the leggings are Burda 9615, both patterns I've used more times than I can count.
This is adorable. My granddaughter would love it. Nice job.
ReplyDeleteVery nice, that neckline is so cute! And ofcourse the owl and the skirt are adorable. Great outfit!
ReplyDeleteThis is so incredibly adorable. If I had a little girl to sew for, I would certainly be taking cues from you. Very, very cute!
ReplyDeleteI love it! Combining fabrics can be tricky, but this turned out very cute.
ReplyDeleteI love it too! BTW, I see nothing wrong with the owl, and think your stitching is great!
ReplyDeleteHellow!
ReplyDeleteI love your site, It is a pleasure to visit.
I have added your site to my site.
Please link my site to your site.
Thank you!
I love how you did the waistband. What a cute idea!
ReplyDeleteI really like your latest creations and I love this outfit. Your daughter, my daughter's friend while we were at seminary, is a well experienced model and doesn't want to overdo the emotions!! I can tell she likes it!!
ReplyDelete