
Burda 9552 - Paper Dolls Dress

Burda 9552

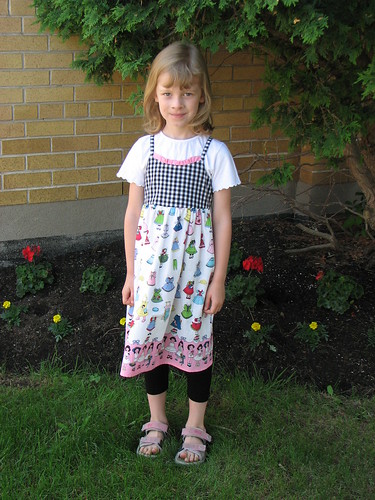
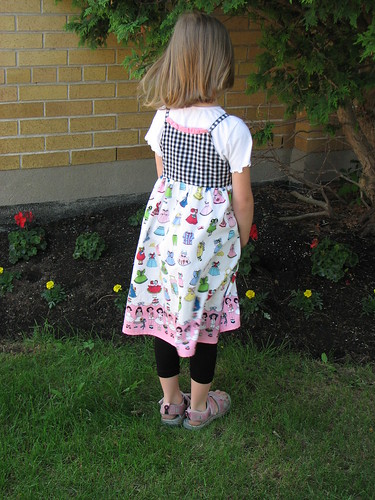
I actually made this dress about a month ago and don't remember much about making it.  So, we'll have more pictures than text today....

Burda 9552

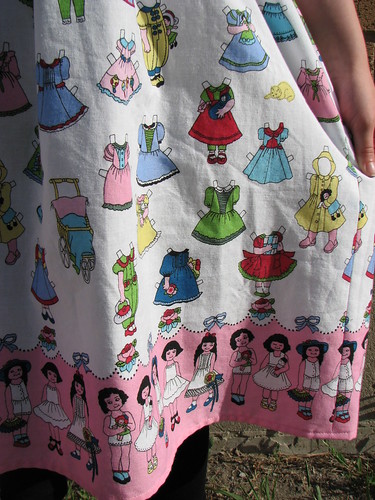
The border print fabric has paper dolls on it.  The Preacher's grandmother gave it to me a couple of years ago.  There wasn't a lot of it - just enough for the skirt of this dress.  I even eliminated one side seam to keep it as simple as possible.

Burda 9552

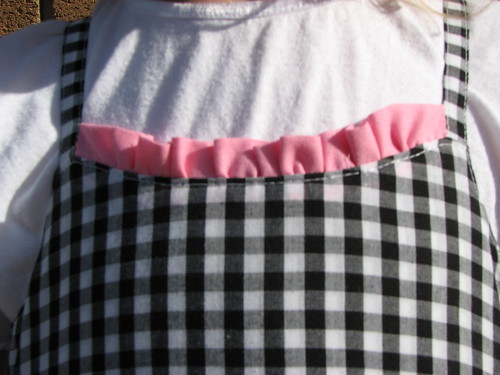
Last summer I asked my mom to pick up some black/white gingham to go with this fabric.  I couldn't find any here and she was coming for a visit. After I had put the gingham with the doll print, I wasn't so sure I liked it. I thought some eyelet trim along the top edges would soften it a bit, but I didn't have any in my stash and didn't have an extra hour and a half to make a trip to the nearest fabric store.  So, I made a ruffle out of the  solid pink at the lower edge of the border.  I'm still not all that excited about it, but my daughter loves it.  And, it's her dress, so that's what counts.

Burda 9552

The leggings are made from Burda 9615 and turned out great.  The doll print fabric is pretty lightweight, so the extra coverage is good.

Burda 9552

Next Up: T-shirts for the little man

Comments

  1. That is just so cute and adorable. I can see why your daughter loves it!..and the pink is really very sweet, great detail!

    ReplyDelete

Post a Comment

Popular posts from this blog

Grocery Bags

More gifts! These are just like the still-all-too-ubiquitous plastic grocery bags, but they're fabric.  I followed this tutorial and you actually use a plastic bag as a pattern.  The instructions are very good and include a pocket so that the bag can be folded up and is easy to keep in a purse or a car's glove box. Mostly for the sake of the gift recipients, here's how to fold up the bag.... 1.  Lay the bag pocket side down and fold it length-wise using the edges of the pocket as a guide. 2.  Fold it in half, aligning the top of the handles with the bottom of the bag. 3.  Fold in half again and then reach into pocket with your hand and turn the whole thing (pocket included) inside out. Happy shopping!

Shopping Bags

Most stores in our town charge you a nickel for a plastic bag when you check out. I love this practice and the way that it encourages people to bring their own cloth bags or reuse their plastic ones. My habit of bringing along bags to the grocery store is well established, but I used to find myself stuck at places like the drug store or farmer's market or other impromptu stops. Then I picked up a bag at an upscale kitchen goods store that rolls up quite compactly. Now I keep that in my purse, so I always have a bag with me. I like my bag so much that I wanted to replicate it for the art sale. The final result is a hybrid of the bag I purchased and these that I made last year. The bag is a little bigger than the average plastic grocery bag. The velcro tab is used to keep the bag rolled up, but also can close the top of the bag when it is full. Most of the bag is a single layer of cotton, but the handles are faced. There is a double row of top-stitching around both edges of

The Burda Skirt Again

I'm not sure what prompted it, but awhile ago I decided that I needed a green skirt. The last time I was at Fabricland I saw this green wide-wale corduroy. I wasn't really looking for the skirt to be corduroy and the color was a little different than I was hoping for, but since I had my eyes peeled for awhile and hadn't seen anything better, I thought I'd try the corduroy. After looking for a suitable pattern, I settled on the Burda 2/2010 skirt that I've already used three times . Because of the weight and bulk of the corduroy, I didn't want to try to mess with too many details. I'll use another skirt pattern soon. Really, I will. One of the things I really like about this pattern is the pockets. This time I made the pocket facings and part of the pocket bag out of a cotton woven solid to reduce bulk. Since I'll be wearing this skirt with tights I added a lining. Adding the lining was really simple except that I cut the lining exactly the sam