I've mentioned before about the gift card fundraising program that my daughter's school uses. I like to participate in this program, but I don't like the gift cards to make my wallet fat and cluttered. I came across this tutorial for a credit card wallet and thought it might be the solution to my problem.
I made two, one for me and one as a gift for my mom since she also participates in this type of program.
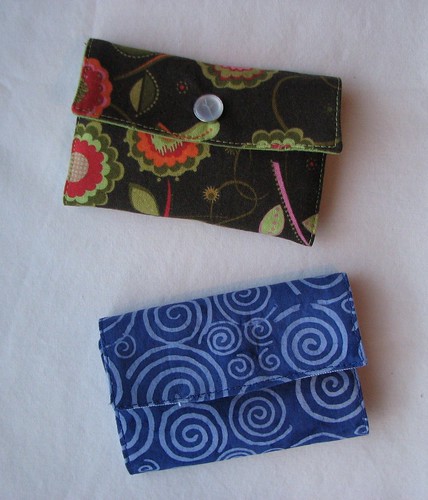
The top one (brown/green - with the cracked snap!) is for me and the bottom (blue) for her.
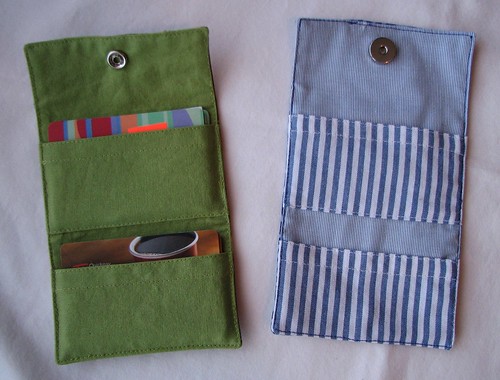
The inside has two pockets that can easily fit six cards in each.

I thought the tutorial was pretty good, but I did change a couple of things. I was uncertain about the seam allowances used, so I modified the size based on what size I wanted it finished and then added 1/4" seam allowances. So, I cut the outer fabric and lining 4.5" x 7.5" and each of the pockets 2.875" x 4.5". The pockets have a 0.5" hem at the top and 0.25" hem at the bottom.
Also, the bottom of the lower pocket is just caught in the seam rather than turned under and stitched down above the seam allowance as the instructions say.
I was picking up the magnetic snap for the blue wallet on the day that I found out Fabricland was closing. I bought every magnetic snap they had in that size. I have enough fabric to keep me sewing for a long time. What I don't always have are buttons, zippers, snaps, thread, etc. So, I might be stocking up on those in the next few months.
I made two, one for me and one as a gift for my mom since she also participates in this type of program.
I thought the tutorial was pretty good, but I did change a couple of things. I was uncertain about the seam allowances used, so I modified the size based on what size I wanted it finished and then added 1/4" seam allowances. So, I cut the outer fabric and lining 4.5" x 7.5" and each of the pockets 2.875" x 4.5". The pockets have a 0.5" hem at the top and 0.25" hem at the bottom.
Also, the bottom of the lower pocket is just caught in the seam rather than turned under and stitched down above the seam allowance as the instructions say.
I was picking up the magnetic snap for the blue wallet on the day that I found out Fabricland was closing. I bought every magnetic snap they had in that size. I have enough fabric to keep me sewing for a long time. What I don't always have are buttons, zippers, snaps, thread, etc. So, I might be stocking up on those in the next few months.
This style of wallet would definitely be useful! (I like the idea of the magnetic snap.)
ReplyDeleteI have "allot" of cards in my wallet and it would be nice to separate them from the "real" cards ":)
I just finished making my own, Renee! Great idea. Had I known earlier, though, I would have put my order in with you. :)
ReplyDelete