I worked on my jeans a little more today. Yesterday I got the fit to a place where I think I can be happy with it. Then I took apart the "muslin" and decided to sew it for real to practice all the other parts of making jeans: topstitching, rivets, placement and design of back pockets, etc. Ideally, I'll be able to wear them a bit, re-evaluate the fit, and then make another pair out of another cut of denim that I like better than this one.
Muslin pictures:
I'm happy with the fit in the front. The rise is a little higher than most of my jeans, but I'm going to leave it as it is with this pair.
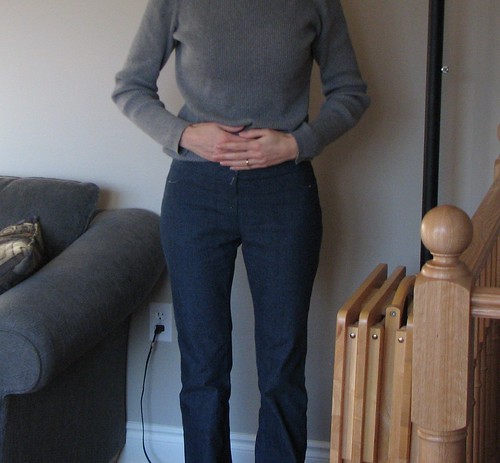
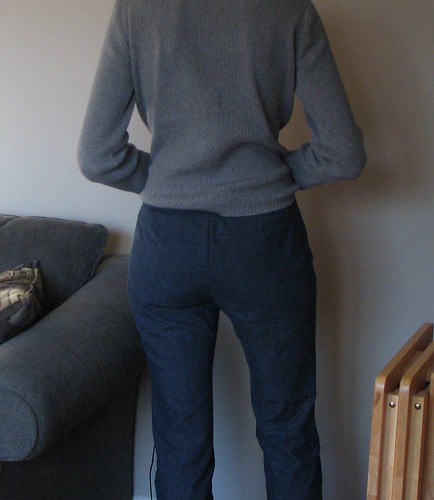
I'm not as pleased about the back. After looking at these pictures, I went back and worked at getting rid of the wrinkles pointing to my high hip. I will put pockets on the back, but wanted to work on the fit without them in the way.
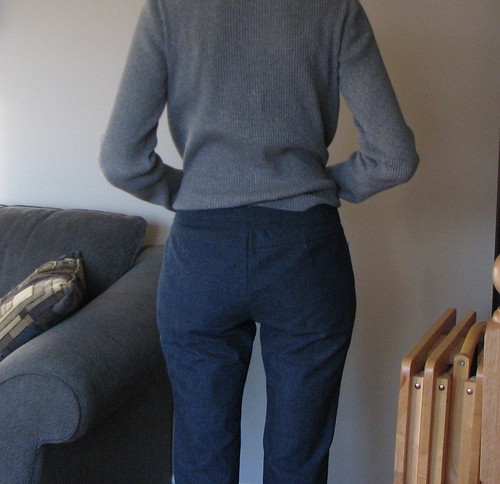
I tried pinning out the wrinkles under my seat, but when I did, I couldn't sit. Well, I could, but it was rather inappropriate. My bum wasn't covered so well anymore. So, the wrinkles stay in the name of sit-ability. When I stand like in the photo below, the wrinkles aren't so noticeable.
Okay, now let's leave my behind behind, shall we?
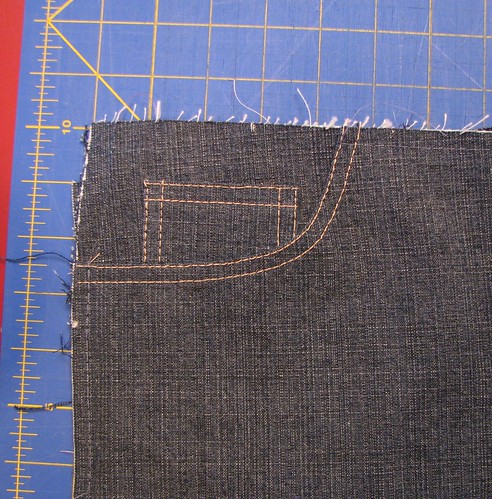
Topstitching is a pretty important part of sewing jeans. I tested out two different types of thread that I have on hand. I thought I might need to check out a couple more, but I was satisfied with the one. I first tried Coats jeans thread. By the fourth pass (right to left, below) I had found the best tension setting and thought this thread could work pretty well. Then I tried Coats upholstery thread and like the look of that better. It's about the same weight as the jeans thread, but a little smoother and I like the color (less gold, more brown) better.

My Pfaff handled the topstitching pretty well, but I was concerned about it being able to stitch through seam intersections and doing the topstitching along those seams. The first test wasn't beautiful, but it did do it. For the second one, I pounded the seam allowances at the intersection with a hammer. This worked pretty well. The seam allowance was much, much flatter. The denim did look slightly distressed after pounding, but not enough to keep me from using that method.
As you can see from the pocket picture below, I'm having a harder time getting nice stitches close to the edge than the second row of topstitching.
The front pockets and back yoke seam are finished and that's as far as I can go until I get some Wonder Tape to use on the fly. I haven't used it before, but it seems pretty important for the method described in the instructions. I'd also like to pick up some rivets and start playing with those.
Muslin pictures:
I'm happy with the fit in the front. The rise is a little higher than most of my jeans, but I'm going to leave it as it is with this pair.
I'm not as pleased about the back. After looking at these pictures, I went back and worked at getting rid of the wrinkles pointing to my high hip. I will put pockets on the back, but wanted to work on the fit without them in the way.
I tried pinning out the wrinkles under my seat, but when I did, I couldn't sit. Well, I could, but it was rather inappropriate. My bum wasn't covered so well anymore. So, the wrinkles stay in the name of sit-ability. When I stand like in the photo below, the wrinkles aren't so noticeable.
Okay, now let's leave my behind behind, shall we?
Topstitching is a pretty important part of sewing jeans. I tested out two different types of thread that I have on hand. I thought I might need to check out a couple more, but I was satisfied with the one. I first tried Coats jeans thread. By the fourth pass (right to left, below) I had found the best tension setting and thought this thread could work pretty well. Then I tried Coats upholstery thread and like the look of that better. It's about the same weight as the jeans thread, but a little smoother and I like the color (less gold, more brown) better.
My Pfaff handled the topstitching pretty well, but I was concerned about it being able to stitch through seam intersections and doing the topstitching along those seams. The first test wasn't beautiful, but it did do it. For the second one, I pounded the seam allowances at the intersection with a hammer. This worked pretty well. The seam allowance was much, much flatter. The denim did look slightly distressed after pounding, but not enough to keep me from using that method.
As you can see from the pocket picture below, I'm having a harder time getting nice stitches close to the edge than the second row of topstitching.
I'm not sure why it looks like the thread is different colors in different places. Odd. It didn't look like that before I uploaded it.
The front pockets and back yoke seam are finished and that's as far as I can go until I get some Wonder Tape to use on the fly. I haven't used it before, but it seems pretty important for the method described in the instructions. I'd also like to pick up some rivets and start playing with those.
They're looking good. I used wonder tape to install a regular zipper in a cotton skirt last month and that stuff is magic!
ReplyDeleteWow! This is amazing; I'd love to make my own jeans, but...well, I'll have to learn to crawl before learning to run!
ReplyDeleteWow - ambitious project - they look great!
ReplyDeleteYour jeans are really looking good!!
ReplyDeleteThese look great. What pattern is it? Jalie or
ReplyDeleteJ. Sterns? I'm almost done the J.Stern ones and I love them.