This past Sunday was the start of a new sermon series at church. It will run until Christmas, covering different aspects of prayer with the theme of "Come, Lord Jesus." The Preacher asked me to make a small banner to hang on the front of the pulpit to go along with the theme.
This sort of sewing makes me nervous. I've said it before and I'll say it again: I'm not an artist. I don't have great ideas for interpreting themes or symbols or combining them and I feel pretty inexperienced and uncreative in what media and skills I am able to use. Church banners are a little like theatrical makeup - it has to be a bit over-the-top up close so that it looks okay from a distance. Anything too subtle just gets lost. Size and scale are much different, too. I don't have much confidence in my ability to judge these things in the design/construction phase. And then knowing that the thing is just going to hang there week after week for a couple hundred people to stare at. Yikes.
After talking over with the Preacher about what he had envisioned, I made a trip to Fabricland and was pretty pleased with the choices I had. I wasn't very optimistic before going. There is a purple table runner that is also used on the communion table, so I was aiming to match that and came pretty close.
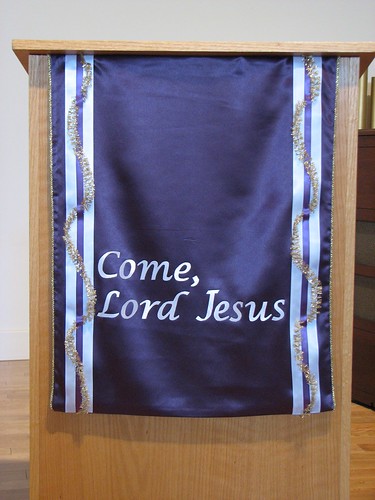
The only thing that is sewn on the whole banner is the outside edges. Everything else is fused. The purple ribbon is fused to the white ribbon in 7" sections. There is a 1" gap in between for the gold trim to slide under. The gold trim is tacked down on the purple ribbon where it passes over it. The lettering is just a font from Microsoft Word, increased to the size we needed, printed as an outline and then traced on Heat-n-Bond. Cutting it out was a little fussy, but they look better than I was expecting them to.

The gold trim is hard to see from the back of church and the white ribbon and satin letters look silver rather than white. I think it would look better if there was more space between the letters and the white ribbon, but it is what it is. My own insecurities about the project make it hard for me to be very objective. I was grateful for a couple of positive comments about it on Sunday.
Since it has been awhile since I've done any garment sewing for myself, I thought I would ease back into it with something nice and easy. Jeans. I think I might be foolish. I have the J Stern Jeans pattern and have been wanting to try sewing jeans for awhile now. I also have the Jalie jeans pattern, but I'm not so excited about stretch jeans lately. I have the practice pair put together and have been tweaking the fit issues for the last couple of days. I'm not sure I'm satisfied yet. It's going to be a long(er)-term project. More to come...
This sort of sewing makes me nervous. I've said it before and I'll say it again: I'm not an artist. I don't have great ideas for interpreting themes or symbols or combining them and I feel pretty inexperienced and uncreative in what media and skills I am able to use. Church banners are a little like theatrical makeup - it has to be a bit over-the-top up close so that it looks okay from a distance. Anything too subtle just gets lost. Size and scale are much different, too. I don't have much confidence in my ability to judge these things in the design/construction phase. And then knowing that the thing is just going to hang there week after week for a couple hundred people to stare at. Yikes.
After talking over with the Preacher about what he had envisioned, I made a trip to Fabricland and was pretty pleased with the choices I had. I wasn't very optimistic before going. There is a purple table runner that is also used on the communion table, so I was aiming to match that and came pretty close.
The gold trim is hard to see from the back of church and the white ribbon and satin letters look silver rather than white. I think it would look better if there was more space between the letters and the white ribbon, but it is what it is. My own insecurities about the project make it hard for me to be very objective. I was grateful for a couple of positive comments about it on Sunday.
Since it has been awhile since I've done any garment sewing for myself, I thought I would ease back into it with something nice and easy. Jeans. I think I might be foolish. I have the J Stern Jeans pattern and have been wanting to try sewing jeans for awhile now. I also have the Jalie jeans pattern, but I'm not so excited about stretch jeans lately. I have the practice pair put together and have been tweaking the fit issues for the last couple of days. I'm not sure I'm satisfied yet. It's going to be a long(er)-term project. More to come...
The banner looks lovely. I like the gold trim woven in the ribbon-very clever. I am sure the congregation will appreciate your talents.
ReplyDeleteAbsolutely beautiful! Very nice job!!
ReplyDelete