So I didn't make my goal. I was hoping to have these finished earlier in the week so they would be on display at the open house event last night. I just finished them this morning. But, since my son was hospitalized with the H1N1 flu and pneumonia for the first half of the week, I'm cutting myself some slack. The little guy is doing well now - he gets tired out easily, but is taking long naps and sleeping well at night.
Anyway, I came up with three stockings. Since these have a limited shelf life, I didn't want to invest much in them. Everything came from my stash except for the beads on the flower.
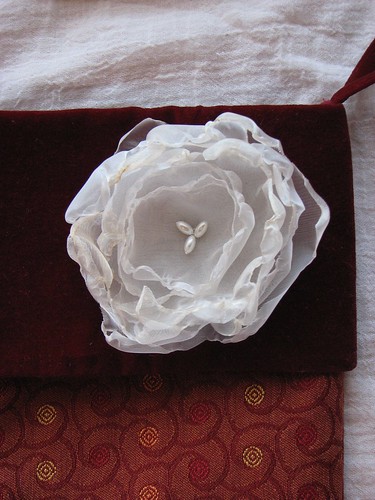
The first is made from uphostery fabric that I picked up a few years ago at a thrift store. The whole piece was about half a yard and the price tag was still on it: $.50. The cuff is a velveteen that was left over from a different project.

The flower is made from poly organza and you can find the tutorial here. It was fun and so easy to make. I purchased the beads since I didn't have any beads or buttons that would look good.
The next one is made from old sweaters. The cuff came from a beautiful lambswool and mohair sweater that I loved but accidently shrunk a bit in the wash. I washed and dried it two more times to felt it more and it came out really soft. The green sweater was just getting too old and worn, so I tried felting that one, too. It was a wool blend, so didn't really felt very much. The right side of the stocking is actually the wrong side of the sweater. The right side didn't look as nice.
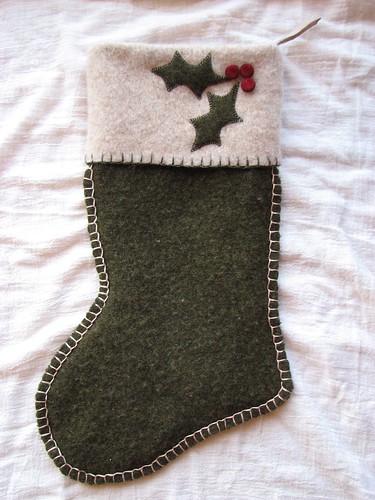
The stocking is sewn right sides together by machine and then I added the decorative blanket stitch with embroidery floss by hand in the seam allowances. The stocking is lined with a woven cotton for a clean finish, but also to make the stocking useable without it stretching out too much.

The holly leaves are cut from the same green sweater as the stocking. I fused interfacing to the back side before cutting out to keep the edges from raveling and to keep the leaves from stretching while I stitched them down. The decorative stitching around the leaves is done by machine. The holly berries are buttons covered in the same velveteen as the cuff on stocking #1.

Since the fabrics I chose for the third stocking all were different weaves and weights, I used foundation piecing, even though the blocks are not complicated. I used muslin for the foundation. I figured this would give the patchwork front more body (I didn't want to quilt it) and also help support the trims and embellishment I added.
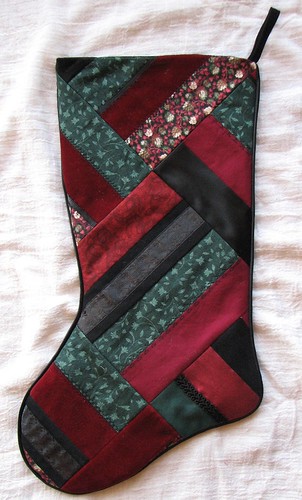
I wanted a bit of the crazy quilt feel, but nothing over the top, so I added some ribbon or trim to each block and a row of decorative (machine) stitching. The outside of the stocking is piped with black satin piping leftover from this project.
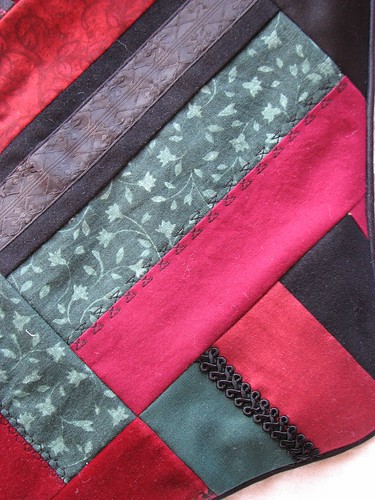
The back of the stocking is a solid black moleskin - satin on one side, sueded on the other. The sueded side is the right side, but I did use the wrong, satin side in some of the patchwork on the stocking front.
I was initially hoping to do four stockings, but the idea for the fourth one just wasn't coming together. And then with the hospitalization "hiccup" in the week...well, I decided that three was good enough. I dropped them off at the shop a couple of hours ago. Bring on the holiday shoppers...
Anyway, I came up with three stockings. Since these have a limited shelf life, I didn't want to invest much in them. Everything came from my stash except for the beads on the flower.
The first is made from uphostery fabric that I picked up a few years ago at a thrift store. The whole piece was about half a yard and the price tag was still on it: $.50. The cuff is a velveteen that was left over from a different project.
The flower is made from poly organza and you can find the tutorial here. It was fun and so easy to make. I purchased the beads since I didn't have any beads or buttons that would look good.
The next one is made from old sweaters. The cuff came from a beautiful lambswool and mohair sweater that I loved but accidently shrunk a bit in the wash. I washed and dried it two more times to felt it more and it came out really soft. The green sweater was just getting too old and worn, so I tried felting that one, too. It was a wool blend, so didn't really felt very much. The right side of the stocking is actually the wrong side of the sweater. The right side didn't look as nice.
The stocking is sewn right sides together by machine and then I added the decorative blanket stitch with embroidery floss by hand in the seam allowances. The stocking is lined with a woven cotton for a clean finish, but also to make the stocking useable without it stretching out too much.
The holly leaves are cut from the same green sweater as the stocking. I fused interfacing to the back side before cutting out to keep the edges from raveling and to keep the leaves from stretching while I stitched them down. The decorative stitching around the leaves is done by machine. The holly berries are buttons covered in the same velveteen as the cuff on stocking #1.
Since the fabrics I chose for the third stocking all were different weaves and weights, I used foundation piecing, even though the blocks are not complicated. I used muslin for the foundation. I figured this would give the patchwork front more body (I didn't want to quilt it) and also help support the trims and embellishment I added.
I wanted a bit of the crazy quilt feel, but nothing over the top, so I added some ribbon or trim to each block and a row of decorative (machine) stitching. The outside of the stocking is piped with black satin piping leftover from this project.
The back of the stocking is a solid black moleskin - satin on one side, sueded on the other. The sueded side is the right side, but I did use the wrong, satin side in some of the patchwork on the stocking front.
I was initially hoping to do four stockings, but the idea for the fourth one just wasn't coming together. And then with the hospitalization "hiccup" in the week...well, I decided that three was good enough. I dropped them off at the shop a couple of hours ago. Bring on the holiday shoppers...
You are so talented and those stocking are beautiful!! Those flowers would look great pinned to a cardigan, too.
ReplyDeleteAbsolutely beautiful! The precision on the patchwork one is so pleasing to my eye. I would have a hard time picking a favorite. I hope they do well in the shop
ReplyDeleteI hope your son continues to get better! Scary with everything going around.... I love the stockings! They are each very unique! I think I liked the last one the best, but I liked them all alot! Great job and very creative!
ReplyDeleteYou are so creative! I love seeing these crafty items and reading how you've used part of this or scraps from that. It's wonderful to be able to use up something that would otherwise be thrown away. Great job!
ReplyDeleteThese are really great - I especially like the quilted one. I'm glad your son is feeling better. H1N1 is no joke.
ReplyDeleteBeautiful stockings!! I've been looking for nice stocking for years and haven't been able to find any til my mother in law knitted one for each of us a few years ago.
ReplyDeleteI bet the stockings you made will be hot items, they are beautiful. My favourite is the first one - elegant and cosy!!
WOW I stumbled across your blog looking for example of Crazy Quilt design type stockings, I really love all of those!
ReplyDeleteI want to try my hand at something like that too! Thanks for the inspiration.
Attractive, post. I just stumbled upon your blog and wanted to say that you are very talented and amazing. I will surely subscribe to your feed, and I hope you will post again very soon! velvet stockings
ReplyDelete