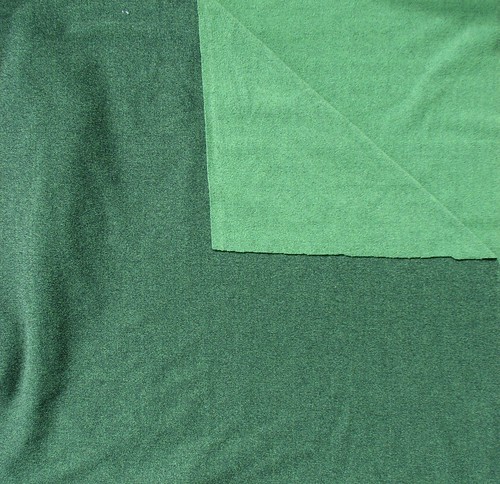
The fabric for this most recent project is a little strange. It's poly fleece and I've had it for a long time - too long to remember what I was thinking when I bought it. I was probably pregnant. I had a really difficult time determining which was the right or wrong side. One side is green and black and looks almost like tweed. The other side is grass green.
It is usually pretty easy to determine the right and wrong side of printed fleece. The right side has a more crisp appearance. On the fleece below, the left side is the wrong side and the right side is the, well, right side.
That was no help with this green fleece, so I consulted Adventures with Polar Fleece by Nancy Cornwell. She suggests some “tests” you can use to determine the right/wrong side of fleece if it isn’t obvious.
1. When you pull along the selvage edge (lengthwise grain), the fleece will curl to the right side. Mine curled to the solid green side.
2. When you pull on the crosswise grain, the fleece will curl to the wrong side. It curled to the green/black side.
3. Examine the cut edge. If there is a definite thicker and thinner side, use the thinner side as the right side. The green/black side is thinner than the green side.
4. Put water on both sides of the fleece. If the water beads up more on one side, that is the right side. There was no difference from one side to the other when I did this.
5. Use the more attractive side. I suppose this is rather subjective, but I liked the green/black side better. I thought it might look like I made something out of that "grass" that they use on miniature golf courses if I used the solid green side.
6. Rough up the fabric and determine which side looks better after. Call me lazy, but I just didn’t do this. I knew this wasn’t going to be a classic, timeless, wear-it-forever sort of garment, so I just wanted to get on with it already.
So, I had two tests indicate that the green/black side was the right side, two tests indicate that the solid green was the right side and one "tie." I went with the green/black side as the right side.

After some washing and wearing, it is usually obvious which is the right side of fleece, so I guess I'll just wait and see if I did it right.

I've used this pattern before - for this vest. The armholes are bound with black swimwear fabric. I didn't notice until I was finished that the instructions actually say to finish the armholes like a neckband. I would have still done it the way I did even if I had bothered to look at the instructions in the beginning. I have a piece of black knit that I'll use to make a top to wear under the vest.
Regarding my hypothesis in the previous post, I did not find myself craving broccoli or anything else green anymore than usual. However, this was a pretty quick project and maybe there wasn't enough time for the color to really do it's work. More data is certainly necessary...
I'll be entering this in the fair in the "Ladies Vest - fleece" category.
Next up: a blouse for my daughter.
It is usually pretty easy to determine the right and wrong side of printed fleece. The right side has a more crisp appearance. On the fleece below, the left side is the wrong side and the right side is the, well, right side.
That was no help with this green fleece, so I consulted Adventures with Polar Fleece by Nancy Cornwell. She suggests some “tests” you can use to determine the right/wrong side of fleece if it isn’t obvious.
1. When you pull along the selvage edge (lengthwise grain), the fleece will curl to the right side. Mine curled to the solid green side.
2. When you pull on the crosswise grain, the fleece will curl to the wrong side. It curled to the green/black side.
3. Examine the cut edge. If there is a definite thicker and thinner side, use the thinner side as the right side. The green/black side is thinner than the green side.
4. Put water on both sides of the fleece. If the water beads up more on one side, that is the right side. There was no difference from one side to the other when I did this.
5. Use the more attractive side. I suppose this is rather subjective, but I liked the green/black side better. I thought it might look like I made something out of that "grass" that they use on miniature golf courses if I used the solid green side.
6. Rough up the fabric and determine which side looks better after. Call me lazy, but I just didn’t do this. I knew this wasn’t going to be a classic, timeless, wear-it-forever sort of garment, so I just wanted to get on with it already.
So, I had two tests indicate that the green/black side was the right side, two tests indicate that the solid green was the right side and one "tie." I went with the green/black side as the right side.
After some washing and wearing, it is usually obvious which is the right side of fleece, so I guess I'll just wait and see if I did it right.
I've used this pattern before - for this vest. The armholes are bound with black swimwear fabric. I didn't notice until I was finished that the instructions actually say to finish the armholes like a neckband. I would have still done it the way I did even if I had bothered to look at the instructions in the beginning. I have a piece of black knit that I'll use to make a top to wear under the vest.
Regarding my hypothesis in the previous post, I did not find myself craving broccoli or anything else green anymore than usual. However, this was a pretty quick project and maybe there wasn't enough time for the color to really do it's work. More data is certainly necessary...
I'll be entering this in the fair in the "Ladies Vest - fleece" category.
Next up: a blouse for my daughter.
Cute vest! So, are you a science teacher? Just wondering with all your experiments and hypothesis. :)
ReplyDeleteLove your vest. I have this pattern too. It's a great one.
ReplyDeleteThis looks great on you! My original thought was that was a lot of green, but after seeing it made up and on you, I think it looks great! Green is a good color on you! :)
ReplyDeleteHi. Very cute vest and looks great on you. Can you please let me know what the pattern you used is? My e-mail add. is seamlessq@aol.com. Thanks.
ReplyDelete