
Chipman's Block Mittens

My mom was knitting a mitten from this pattern when she came for a visit and I liked it so much I borrowed the pattern from her and made a pair myself. I thought they would be for my oldest daughter, but they are way too big for this coming winter. The odds of me knowing where they are when they finially fit are not good.

This picture was taken just a short walk from our campsite in Rocky Mountain National Park. It was so beautiful!


This is the second project I have tried in fair isle. My tension still needs a bit of work, but these are an improvement over the first project (a hat). I attended a workshop at a yarn shop about fair isle knitting and the instructor told us to wrap every stitch so that you don't get long "floats" of yarn on the wrong side that can get snagged and so the fabric doesn't get puckered on the right side. Knitting this way makes for a very dense and warm fabric - ideal for mittens.

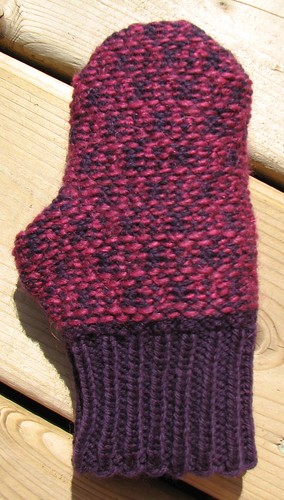
The pattern comes from Knit Mittens! by Robin Hansen. It's called "Chipman's Block." My mom's mittens are green and yellow and I think I like the higher contrast of her's better than the dark pink and purple of mine. The pink is Lamb's Pride Worsted and the purple is Cascade 220. Using two different colors of the same type of yarn probably would have helped with my tension issues.


This was a good pattern for a fair isle beginner as the pattern is not complicated. There is a chart, but it has a short repeat and it is quickly internalized. The pattern is sized for worsted yarn knit on size 1 and 3 needles. The cuffs and thumbs are knit on size 1 and the hand is knit on the 3's. Knitting with worsted yarn on size 1 needles sounded pretty painful to me, so I did all of the first mitten with the 3's. When I was finished, I did think that the thumb looked pretty big (the mitten on the left below), so on the second one, I did the thumb on the size 1. And I did find it painful. But, the thumb looks better.

Now I've got another pair of socks on the needles. But I'm clearly going to run out of yarn before they are finished. Buying more of the same yarn is not an option. What to do, what to do....

Comments

Post a Comment

Popular posts from this blog

Grocery Bags

More gifts! These are just like the still-all-too-ubiquitous plastic grocery bags, but they're fabric.  I followed this tutorial and you actually use a plastic bag as a pattern.  The instructions are very good and include a pocket so that the bag can be folded up and is easy to keep in a purse or a car's glove box. Mostly for the sake of the gift recipients, here's how to fold up the bag.... 1.  Lay the bag pocket side down and fold it length-wise using the edges of the pocket as a guide. 2.  Fold it in half, aligning the top of the handles with the bottom of the bag. 3.  Fold in half again and then reach into pocket with your hand and turn the whole thing (pocket included) inside out. Happy shopping!

Shopping Bags

Most stores in our town charge you a nickel for a plastic bag when you check out. I love this practice and the way that it encourages people to bring their own cloth bags or reuse their plastic ones. My habit of bringing along bags to the grocery store is well established, but I used to find myself stuck at places like the drug store or farmer's market or other impromptu stops. Then I picked up a bag at an upscale kitchen goods store that rolls up quite compactly. Now I keep that in my purse, so I always have a bag with me. I like my bag so much that I wanted to replicate it for the art sale. The final result is a hybrid of the bag I purchased and these that I made last year. The bag is a little bigger than the average plastic grocery bag. The velcro tab is used to keep the bag rolled up, but also can close the top of the bag when it is full. Most of the bag is a single layer of cotton, but the handles are faced. There is a double row of top-stitching around both edges of

The Burda Skirt Again

I'm not sure what prompted it, but awhile ago I decided that I needed a green skirt. The last time I was at Fabricland I saw this green wide-wale corduroy. I wasn't really looking for the skirt to be corduroy and the color was a little different than I was hoping for, but since I had my eyes peeled for awhile and hadn't seen anything better, I thought I'd try the corduroy. After looking for a suitable pattern, I settled on the Burda 2/2010 skirt that I've already used three times . Because of the weight and bulk of the corduroy, I didn't want to try to mess with too many details. I'll use another skirt pattern soon. Really, I will. One of the things I really like about this pattern is the pockets. This time I made the pocket facings and part of the pocket bag out of a cotton woven solid to reduce bulk. Since I'll be wearing this skirt with tights I added a lining. Adding the lining was really simple except that I cut the lining exactly the sam