
I finished this dress early last week, but didn't get a picture of it on my daughter until today. I'm really happy with how it turned out. My daughter is too. Even though this wasn't one of her gifts, we're calling this her "birthday dress." Her 5th birthday was on Friday.

This pattern, Simplicity 3512, could possibly restore some of my faith in the big 4 patterns for toddlers and children. There is not an excessive amount of ease in this one. I matched my daughter's measurements to the ones on the envelope and started with that size. It worked! I did do a lot of measuring the pattern pieces too as I was still doubtful.

I made a size 3, adding a total of more than 3.5" in length - 1" to the bodice and 2.5" to the skirt above the godets. After she tried on the bodice and I pinned part of the skirt on, I thought it was still shorter than I wanted, so the waist has a 3/8" seam and I took up the hem 1/4" rather than the 5/8" allowed.
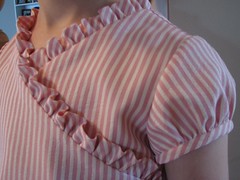
The neckline is great - it has details and it isn't too low. The ruffles are just the right size and it crosses her breastbone nice and high. She loves the big ribbon bow, too.

The pattern instructions suggest sewing the skirt panels together from the top down to the dot where the godet starts. Then you insert the godet by sewing along one side, breaking the stitching at the dot and then sewing along the other side. I've never made anything with godets before, but this method didn't sound so good to me. I attached one side of the godet to the skirt panel, then attached the other side to the next panel and then stiched the seam from the godet up to the top of the skirt. It isn't hard, just requires some precision. I was careful to make sure that the stripes on all the godets were going the same direction.
I found this fabric at a thrift store for a couple dollars. I think there was 1.5 yards. I'm not sure exactly what it is. It looks a little like seersucker, but isn't cotton. It doesn't press all that well, but it doesn't wrinkle either. The fabric didn't have a right or wrong side (that I could tell). Sometimes this was helpful (when getting the godets in the right direction) and sometimes it was a nuisance (like when I made two right bodice sections for the lining).
So pretty!
ReplyDeleteThe dress looks beautiful on her and she looks so happy to wear it!! Wonderful!!
ReplyDeleteHi, Just found your blog through pattern review and appreciate your comments. Just getting back into sewing for my 1 year old granddaughter and very frustrated with the out-sized finished products. Especially frustrating since they live across the country and I can't try on things midway through sewing.
ReplyDeleteLoved the fit on this one so much (and so afraid to try another pattern) that I made 2 views from it... the same as yours and also a combo of views B and C that I spruced up with some machine embroidery.
Many thanks for your helpful comments on Burda and Kwik Sew. I just finished making a kitty pillow from Kwik Sew and very pleased. Now to try some of their toddler clothes. Have you tried Ottobre? Or any other pattern companies to recommend?
Dianne, I'm glad this dress worked for your granddaughter. I think it's a great pattern. I haven't tried Ottobre yet, but I would really like to. I just have to get my hands on one somehow. Otherwise, I mostly stick with Burda and Kwik Sew. If I try a Big 4, I do a LOT of flat pattern measuring first. Hope that helps!
ReplyDelete