I was on a self-imposed sewing fast last week. We live in a parsonage and it was renovated during February and March. On Saturday we had an Open House so that the church could come see the final result. There's nothing like the thought of a churchful of people coming through your home to motivate you to get things in order. Actually, the thought of that really made me want to run and hide away in my sewing room. Thus, the self-imposed fast. Too much to do and no time to sew. It was a rough week, but now it's over. (And the open house went quite well). The sewing machine was humming away again today.
 I made summer hats for my girls. The older daughter's came from the April issue of BWOF and is my first attempt at these patterns. I picked up a copy in NY and thought a hat would be a nice simple way to get my feet wet. There are other patterns in this issue that I plan to try, too.
 I think it turned out pretty cute. I had some doubts in process - it looks quite a lot like a bucket on the head. When I showed the finished product to my daughter she giggled and said, "It looks like a gardening hat!" I found that curious, so I asked her what a gardening hat looked like. (Pointing to the hat) "Like this!" Gotcha. So, how do you know what a gardening hat is? (Sounding exasperated) "I don't know, mom. Sometimes I just know things." Oh, right. Okay. However she learned about gardening hats, it made a good impression because she is thrilled with her hat.
 I added channel stitching around the brim and bias trim at the base of the sides. The hat is lined with the same fabric as the bias trim: a pink striped cotton shirting with embroidered roses on it.
The younger daughter's hat is made from Butterick 3782. I used a cotton floral print that actually looks a lot like the one in the picture. I've found this to be a good infant/toddler hat pattern. I've tried quite a few and this one works better than most. There are four crown pieces and the brim is wide enough to protect the face, but not too wide to be floppy or block vision.
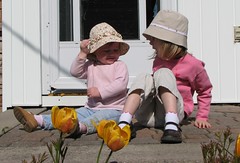 She's not quite as thrilled about her hat. It doesn't stay on very long.
I'm still waiting for one book from the library to resume work on the spring jacket. One book did arrive (Tailoring: The Classic Guide to Sewing the Perfect Jacket) and while it looks like a great book and one that I'd love to have in my own library, it doesn't have the info that I need. I'm holding out hope that the other one (Easy Guide to Sewing Linings) does. Spring might be long gone before I get to finish this jacket. *sigh*
I love the hats - they are darling!! Your daughter is a wise one!! Some things they just learn and we're all not sure how that happened!!
ReplyDeleteSo glad your Open House went well and that the sewing machine and you are happily humming again!!