More fru-fru dancing clothes for my daughter…
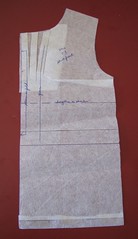
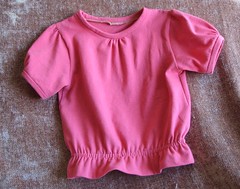
 The shirt is made from Kwik Sew 2918, yet again. To add the gathers at center front (CF), I slashed the neckline down into the bodice in three places close to the CF. I spread these apart while keeping the CF on the straight grain. I slashed in the side seam under the armhole and overlapped the pattern to release the bubble made from spreading at the neckline. This is essentially moving a dart, but this pattern doesn’t have any darts (or need any) to start with. Overlapping at the side seam shortened the seam, so I added that back in at the bottom. The neckline is finished with a binding.

 The original plan was just to hem the shirt, but when she tried it on with the skirt, I didn’t think a plain hem would really look very good. It probably would if she kept her tops tucked in, but that doesn’t usually last more than a few minutes. So, I “borrowed” this look from one of her other shirts. I turned up two inches, made a casing and inserted ¼” elastic in it. She likes it – by her way of thinking, there’s always room for one more ruffle.
 The skirt is just two rectangles. The top one is two inches bigger in circumference than my daughter’s waist. The lower one is 1.5 times that measurement. Surprisingly (for me), I didn’t write the actual numbers down, I just calculated and cut. I pictured the trim between the yoke and the skirt being turned up toward the yoke, but with the bulky gathers, the seam allowance turns up and the trim turns down.

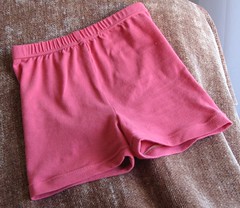
This time I did have enough fabric to make shorts. I thought it would be best to attach the shorts to the skirt before making the casing so that essentially they are one piece, but for some reason my daughter really didn’t like that idea. She’s not so worried about bulk around the waist yet, I guess. I used Burda 9615 for these shorts – a great, simple pattern with no side seams. I’ve only made the shorts, but the leggings look great too.
For all the pink sewing that I do, I don’t have any pink cone thread for my serger. I should probably fix that. But, I’m trying to stay away from the fabric store. I spent my allowance for the next couple of years in NY. All of this fabric and trim I bought in NY. (The shirt and skirt are actually a better match than the picture represents).
 The shirt is made from Kwik Sew 2918, yet again. To add the gathers at center front (CF), I slashed the neckline down into the bodice in three places close to the CF. I spread these apart while keeping the CF on the straight grain. I slashed in the side seam under the armhole and overlapped the pattern to release the bubble made from spreading at the neckline. This is essentially moving a dart, but this pattern doesn’t have any darts (or need any) to start with. Overlapping at the side seam shortened the seam, so I added that back in at the bottom. The neckline is finished with a binding.
I also slashed and spread the sleeve pattern in three places from top to bottom to change the basic sleeve into a gathered, puffed sleeve. If I do this again, I think I would add more into the sleeve. It really doesn’t “puff” all that much. But, this fabric is pretty lightweight and for something with more body the amount I added would probably be sufficient. The sleeves are also finished with a binding.
 The original plan was just to hem the shirt, but when she tried it on with the skirt, I didn’t think a plain hem would really look very good. It probably would if she kept her tops tucked in, but that doesn’t usually last more than a few minutes. So, I “borrowed” this look from one of her other shirts. I turned up two inches, made a casing and inserted ¼” elastic in it. She likes it – by her way of thinking, there’s always room for one more ruffle.
 The skirt is just two rectangles. The top one is two inches bigger in circumference than my daughter’s waist. The lower one is 1.5 times that measurement. Surprisingly (for me), I didn’t write the actual numbers down, I just calculated and cut. I pictured the trim between the yoke and the skirt being turned up toward the yoke, but with the bulky gathers, the seam allowance turns up and the trim turns down.
This time I did have enough fabric to make shorts. I thought it would be best to attach the shorts to the skirt before making the casing so that essentially they are one piece, but for some reason my daughter really didn’t like that idea. She’s not so worried about bulk around the waist yet, I guess. I used Burda 9615 for these shorts – a great, simple pattern with no side seams. I’ve only made the shorts, but the leggings look great too.
For all the pink sewing that I do, I don’t have any pink cone thread for my serger. I should probably fix that. But, I’m trying to stay away from the fabric store. I spent my allowance for the next couple of years in NY. All of this fabric and trim I bought in NY. (The shirt and skirt are actually a better match than the picture represents).
Very cute outfit for your dd.
ReplyDeleteI love this outfit! I am going to have to get burda 9615 because so often I want leggings or shorts for my dd's skirts! The skirt fabric and style looks totally rtw! The shirt is really cute too with the gathers and elastic at the waist!
ReplyDelete