I’m going on a trip to NYC with my mom in approximately 2 weeks. Well, let's make that exactly 16 days. I am so, So, SO excited about this trip. Of course the thing I am most excited about is fabric shopping in the garment district. We’ll see some other things, too but the fabric shopping part is what I have spent the most time thinking about and preparing for. We’ll be getting around mostly by foot while we’re there and I needed a good bag to tote the essentials around.
I did have a few criteria for this bag. It needed to be…
…something I could make quickly and easily (I do still have 16 days, but those 16 days include a move back into our newly renovated – and beautiful – home. These are busy days).
…a messenger-style bag that crossed from one shoulder to the opposite hip (I want it to be secure and have hands entirely free to touch all that fabric. No straps sliding down off my shoulder).
…big enough to fit a binder in (the binder will hold all of the garment district related info that I want to have with me: swatches, pattern spec sheets, store reviews, maps, etc).
…an easily accessible pattern. No ordering anything online and waiting for it to be shipped to me.
A bit of research online led me to the Lula Louise blog with a great pattern and instructions for a reversible shoulder bag.
Here’s my version:
 I increased the length of the strap by 6” so that it would easily work across my body and I would still be able to get things in and out of it while wearing it. (I’m tall). I tapered the strap by 1” (1/2” on each side). I added a magnetic snap as a closure and included two pockets on the inside. So, my bag isn’t reversible, but I’m okay with that.
 One of the pockets is flat and the other has pleats so that it can hold something larger. I cut them both on the bias just to make it a little interesting (and maybe so that I wouldn’t have to match the plaids).
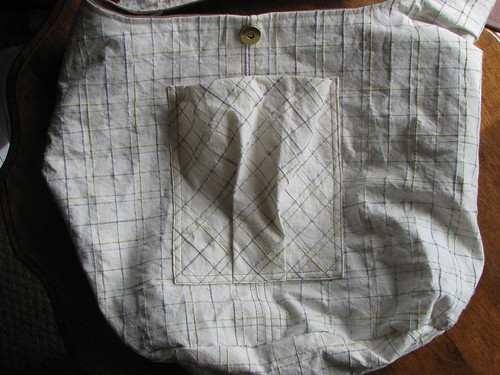 Both fabrics are from the home decorating department of Fabricland. I like the feel of the outer fabric – strong and substantial, but not stiff. The lining fabric was right next to the outer one on the table at the store. I could have found a better match if I had looked more, but with two unhappy kids with me in the store, this was “good enough.” *sigh* The outer fabric didn’t want to press well at all. Grrrr. The topstitching around most of the bag keeps it nice and flat, but the bottom of the bag looks like I didn’t press it at all. I couldn’t topstitch it because of the gathers at the ends. This is the only part of the bag that I don’t like.
 New York, here I come!! Coming soon…some “necessary sewing.” Bleh.
I did have a few criteria for this bag. It needed to be…
…something I could make quickly and easily (I do still have 16 days, but those 16 days include a move back into our newly renovated – and beautiful – home. These are busy days).
…a messenger-style bag that crossed from one shoulder to the opposite hip (I want it to be secure and have hands entirely free to touch all that fabric. No straps sliding down off my shoulder).
…big enough to fit a binder in (the binder will hold all of the garment district related info that I want to have with me: swatches, pattern spec sheets, store reviews, maps, etc).
…an easily accessible pattern. No ordering anything online and waiting for it to be shipped to me.
A bit of research online led me to the Lula Louise blog with a great pattern and instructions for a reversible shoulder bag.
Here’s my version:
I increased the length of the strap by 6” so that it would easily work across my body and I would still be able to get things in and out of it while wearing it. (I’m tall). I tapered the strap by 1” (1/2” on each side). I added a magnetic snap as a closure and included two pockets on the inside. So, my bag isn’t reversible, but I’m okay with that.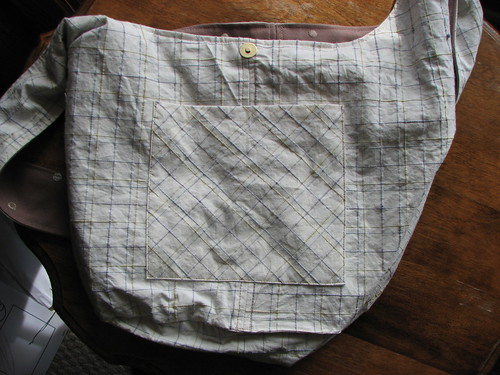 One of the pockets is flat and the other has pleats so that it can hold something larger. I cut them both on the bias just to make it a little interesting (and maybe so that I wouldn’t have to match the plaids).Both fabrics are from the home decorating department of Fabricland. I like the feel of the outer fabric – strong and substantial, but not stiff. The lining fabric was right next to the outer one on the table at the store. I could have found a better match if I had looked more, but with two unhappy kids with me in the store, this was “good enough.” *sigh* The outer fabric didn’t want to press well at all. Grrrr. The topstitching around most of the bag keeps it nice and flat, but the bottom of the bag looks like I didn’t press it at all. I couldn’t topstitch it because of the gathers at the ends. This is the only part of the bag that I don’t like.New York, here I come!! Coming soon…some “necessary sewing.” Bleh.
I am excited to see the treasures that will fill that beautiful bag. I'm going with a near empty suitcase.
ReplyDeleteI like your bags, I am almost finished making one, and was trying to find a solution to not using a zip, I have made it curved on top, so things could fall out. Its lined with feltto make it stif.
ReplyDelete