 This is my second attempt at this pattern. The first didn’t turn out all that well. I had major fit issues in the back.
 Look at all those wrinkles! And this was after taking at least one full inch off of the back inseam.
Well, this was like an itch that just needed to be scratched and I was pretty determined to get a better fit. Initially I should have started with a smaller size, but the pattern I was using was now out-of-print.
 It is nearly impossible to tell what the pants really look like from the picture. Black clothing doesn’t photograph well – even for professionals apparently. The line drawing is much more helpful (click on it for a clearer view).
 I bought another, very similar pattern in a smaller size (Vogue 2907). I read and studied “Pants for Real People” from Palmer/Pletsch and then was unsure about whether to just continue with the pattern I had already used and made some modifications to or go back to the very beginning and start with 2907. Hmmmm… Since I essentially had a finished muslin in the first pair of pants, I decided to stick with the first pattern.
These are the alterations I made the first time around….
After making the muslin:
*I took in 1/2" from the top of the yoke at CB. Tapered to 1/4" at CB of pants.
*I lowered the yoke at the side seams 1/4".
*I took in the side seams 3/8".
*I "filled in" the front crotch curve, adding 1/4" at the base of the curve.
*I added 5/8" to each side at the hem for a total addition of 2.5 inches in circumference.
After trying on the “real” pants:
*I took in 1" at the top of the back inseam, tapering to 0 at the knee.
*I took in 3/8" at the top of the front inseam, also tapering to 0 at the knee.
*I scooped out the back of the crotch seam by lowering the seam 3/8" (for a total difference of 3/4").
This resulted in the fit you see above. Clearly more work needed to be done. My biggest fit issue in pants (other than length – RTW problem only) is the seat. My flat bum leaves a lot of extra fabric sagging, bagging and wrinkling around the top of my legs in back. This is very clear from the side view of the first pants.
 It seems the best way to fix this is by making a tuck in the back pattern piece parallel to the grainline for the full length of the pants. I took a ½” tuck. I also took ¼” off the back inseam and 1/8” off the front inseam (this is on top of what is mentioned above). Removing fabric from the inseams changes the crotch curve and I scooped out another ½” to make up for it. The PFRP book also suggested lowering the waistline at CB for a flat bum and I took off ½”. If I make these again, I will add that back on. I don’t think I really needed that, particularly with this pattern. They aren’t plumber pants yet, but they aren’t far from it either.
After all that, here’s the back view:
 (That's a pretty small, dark photo, isn't it? I guess I was in a hurry to get this up and didn't want to wait for the Preacher to play photographer. I think I'll have to come back and edit it later.)
Perhaps not perfect, but a considerable improvement. It is easy to overanalyze a picture, but in real life you have to be able to walk, bend, sit, crawl around on the floor (okay, maybe not everyone does that, but it is a regular part of my life). So, sometimes necessary wearing ease looks like wrinkles or drag lines in a picture.
Other non-fit changes:
Other non-fit changes:
The welt pockets are totally fake! I’ve made quite a few welt pockets, but they’ve all been real. It never occurred to me to make them fake until it was suggested in the PFRP book. They wondered why you would want extra bulk in the back. Considering the problems my flat bum causes, maybe I do want extra bulk there….
 I really like the little loop closures except for the fact that they don’t match! The topstitching is on the outside of the loop on one and on the inside on the other. Grrrrr. I’m so annoyed that I missed this when it could have been fixed. It wasn’t until I was hemming the pants that it caught my eye. I let out a yell that startled the Preacher. When he learned the cause for my yelling he didn’t really think that it was warranted.
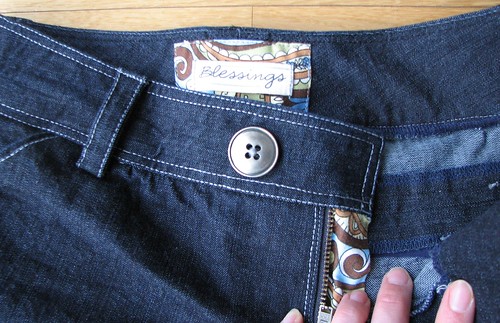
The pattern calls for a sewn-on fly. I did follow the instructions for this on the first pair and I found the instructions good. But, I didn’t really want to mess with it on this pair and added the fly facing pieces to the pattern before cutting. The fly guard is cut from contrast fabric – a cotton paisley print. I used the same fabric for the front pocket facing and backing for the “tag” (just ribbon from the scrapbooking department of Michael’s).
 I also decreased the height of the waistband/yoke by 1”.
The topstitching is done with two strands of grey multi-purpose thread. Increasing the tension and using a topstitch needle helped to get pretty good results. (The more I sew, the more I see that using the proper needle makes ALL the difference!) I wouldn’t describe the grey as “light” but it looks pretty bright against the dark denim. Perhaps a shade or two darker would be preferable.
 I estimate these pants cost about $10.00. The fabric was pretty inexpensive and I was intending these to be a second muslin. But, the more I wear them, the more I like them. I do think the crotch curve could use a little work yet. In the rear view pic it looks like I have a bit of a wedgie, eh? It really doesn’t feel like that when I’m wearing them. I wonder what that means….back to the drawing board….
What a great job on the denim pants. Thanks for the idea of faux welt pockets.
ReplyDeleteHi, Good job. If you have future specific fit issues, just e-mail me a photo and I will try to help. Pati Palmer, co-author Pants for Real People.
ReplyDeleteReally late commenting, but these pants fit you perfect. You did a great job fitting them.
ReplyDelete